🌙 Vue长列表虚拟滚动插件封装
🌙 1.虚拟滚动概述
场景引入
思考:
老板让我开发一个 类似 新浪新闻 移动端 H5 Web页面,需要怎样设计,才能符合**「 企业实践标准 」**?
根据用户行为,滑动下拉置底,使用 Axios ,按需请求分页数据,追加显示页面。
思考:
如果,我们不断下拉访问,页面中有大量的新闻列表的时候,用户会不会有不好的体验?
案例:
使用 Vue 构建一个页面,直接将 10000 条新闻类列表数据显示到页面上,体验效果
PS:通过 Chrome 浏览器性能分析工具 Performance,监测分析页面前端性能数据
FPS,每秒帧数,图表上的红色块表示长时间帧,很可能会出现卡顿;
CPU,CPU消耗占用,实体图越多消耗越高
NET,网络请求效率
通过 CHrome 浏览器内存分析工具 Memory,监测分析内存消耗情况
一个长列表 Web 页面,如果需要展示成千上万条数据,那么页面中就会有数万甚至数十万的HTML节点,会巨大的消耗浏览器性能,进而给用户造成非常不友好的体验。
- 页面等待时间极长,用户体验差;
- CPU 计算能力不够,滑动会卡顿;
- GPU 渲染能力不够,页面会跳屏;
- RAM 内存容量不够,浏览器崩溃。
思考:
前端如何优化这种 「 长列表 」显示场景,才能符合**「 企业最佳实践标准 」**?
- 不把长列表数据一次性全部直接显示在页面上;
- 截取长列表一部分数据用来填充屏幕容器区域;
- 长列表数据不可视部分使用使用空白占位填充;
- 监听滚动事件根据滚动位置动态改变可视列表;
- 监听滚动事件根据滚动位置动态改变空白填充。
我们也把上面的优化行为简称为 「 虚拟滚动 」
案例:
同样使用 Vue 构建一个页面,使用虚拟滚动显示 10000 条数据,监听分析前端性能数据
PS:通过 Chrome 浏览器元素查阅工具 Elements,查看空白填充区域动态变化效果
概念介绍
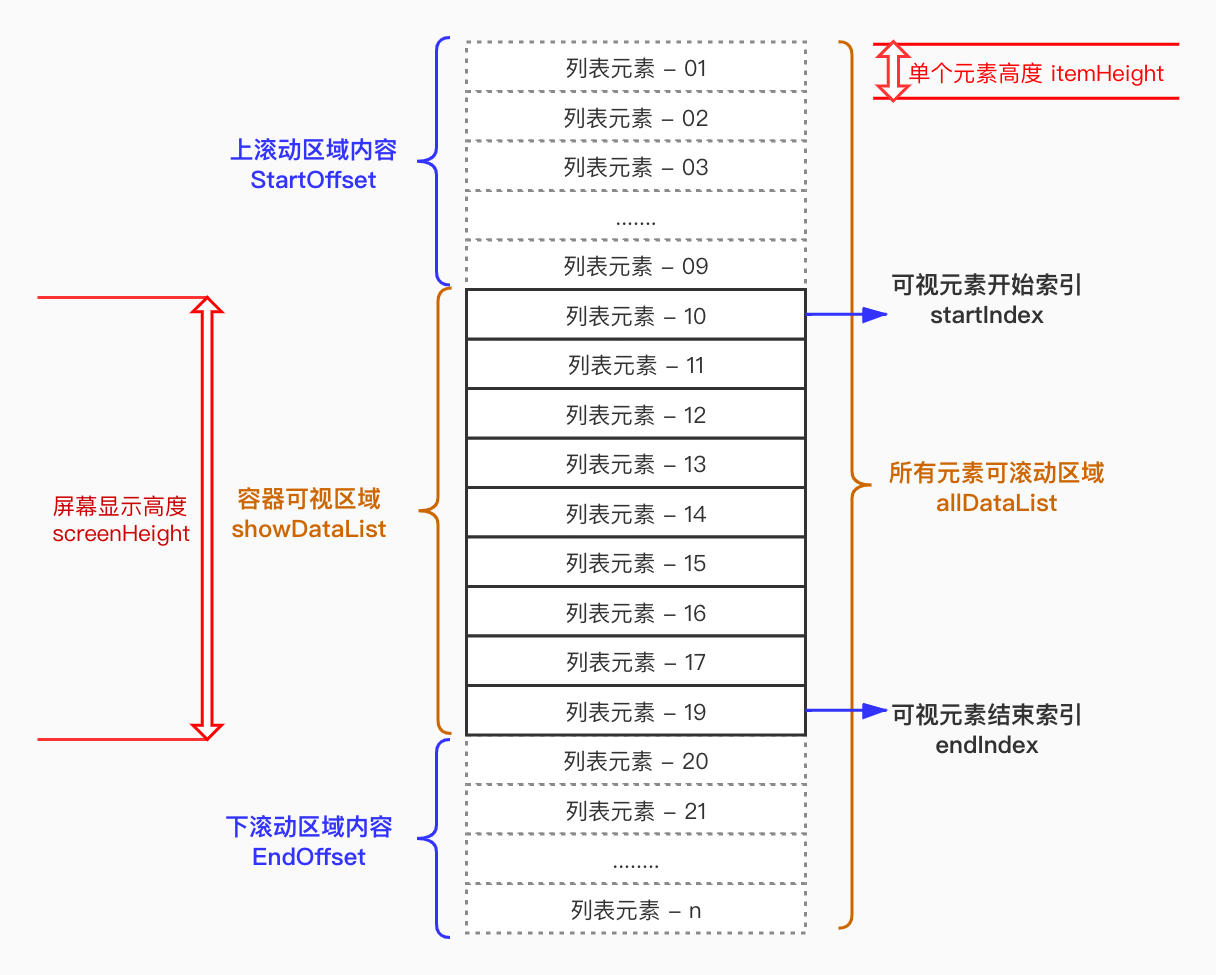
虚拟滚动,就是根据 「 容器可视区域 」 的 「 列表容积数量 」,监听用户滑动或者滚动事件,动态截取 「 长列表数据 」 中的 「 部分数据 」 渲染到页面上,动态使用空白占位填充容器 「上下滚动区域内容 」 ,模拟实现 「 原生滚动效果 」。
课程安排
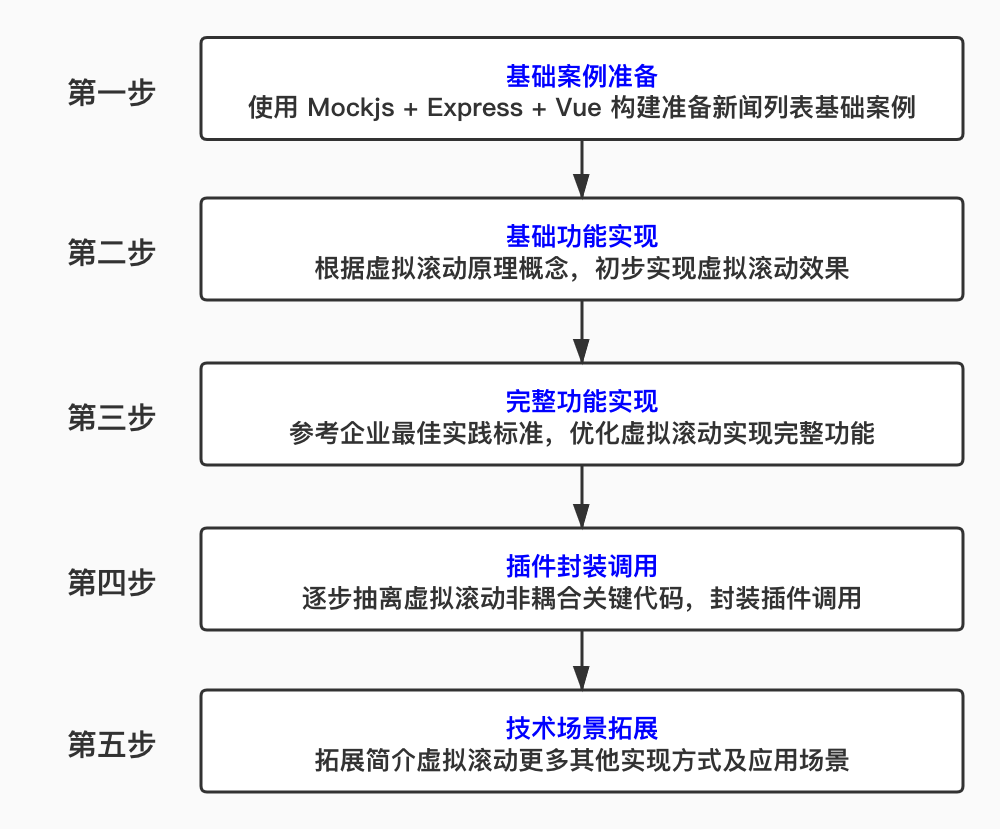
🌙 2.基础案例准备
🌙 使用 Express + Mockjs 模拟新闻类列表API接口
Express 官方文档快速入门 (opens new window)
Mockjs 官方文档快速入门 (opens new window)
// 使用 Mock 构建本地服务器输出数据结果
const Mock = require('mockjs');
const express = require('express');
const app = express();
//根据传入的参数 num,生成 num 条模拟的数据列表
function generatorList(num) {
  return Mock.mock({
    [`list|${num}`]: [{
      // 模拟 ID,自增方式追加
      'id|+1': 1,
      // 模拟标题,中文字符串长度为 20 位到 30 位
      title: "@ctitle(15,25)",
      // 模拟图片索引,自然数从 0 到 15
      image: "@natural(0,15)",
      // 模拟访问人数,自然数从 0 到 99999
      reads: "@natural(0,99999)",
      // 模拟新闻来源,中文字符串长度为 3 到 10 位
      from: "@ctitle(3,7)",
      // 模拟发布时间,时间格式
      date:"@date('yyyy-MM-dd')"
    }]
  });
}
//允许跨域请求返回数据
app.all('*', function (req, res, next) {
  res.header("Access-Control-Allow-Origin", "*");
  res.header('Access-Control-Allow-Methods', 'PUT, GET, POST, DELETE, OPTIONS');
  res.header("Access-Control-Allow-Headers", "X-Requested-With");
  res.header('Access-Control-Allow-Headers', 'Content-Type');
  next();
});
//截取路由并反馈数据
app.get("/data", function (req, res) {
  // 获取 get 请求数据条数参数 num
  const { num } = req.query;
  return res.send(generatorList(num));
})
//设置端口并打印对应调用结果
const server = app.listen(4000, function () {
  console.log("本地mock服务启动,接口地址为:http://localhost:4000/data?num=请求列表数量");
})
2
3
4
5
6
7
8
9
10
11
12
13
14
15
16
17
18
19
20
21
22
23
24
25
26
27
28
29
30
31
32
33
34
35
36
37
38
39
40
41
🌙 基于 Vue-Cli 脚手架准备基础案例
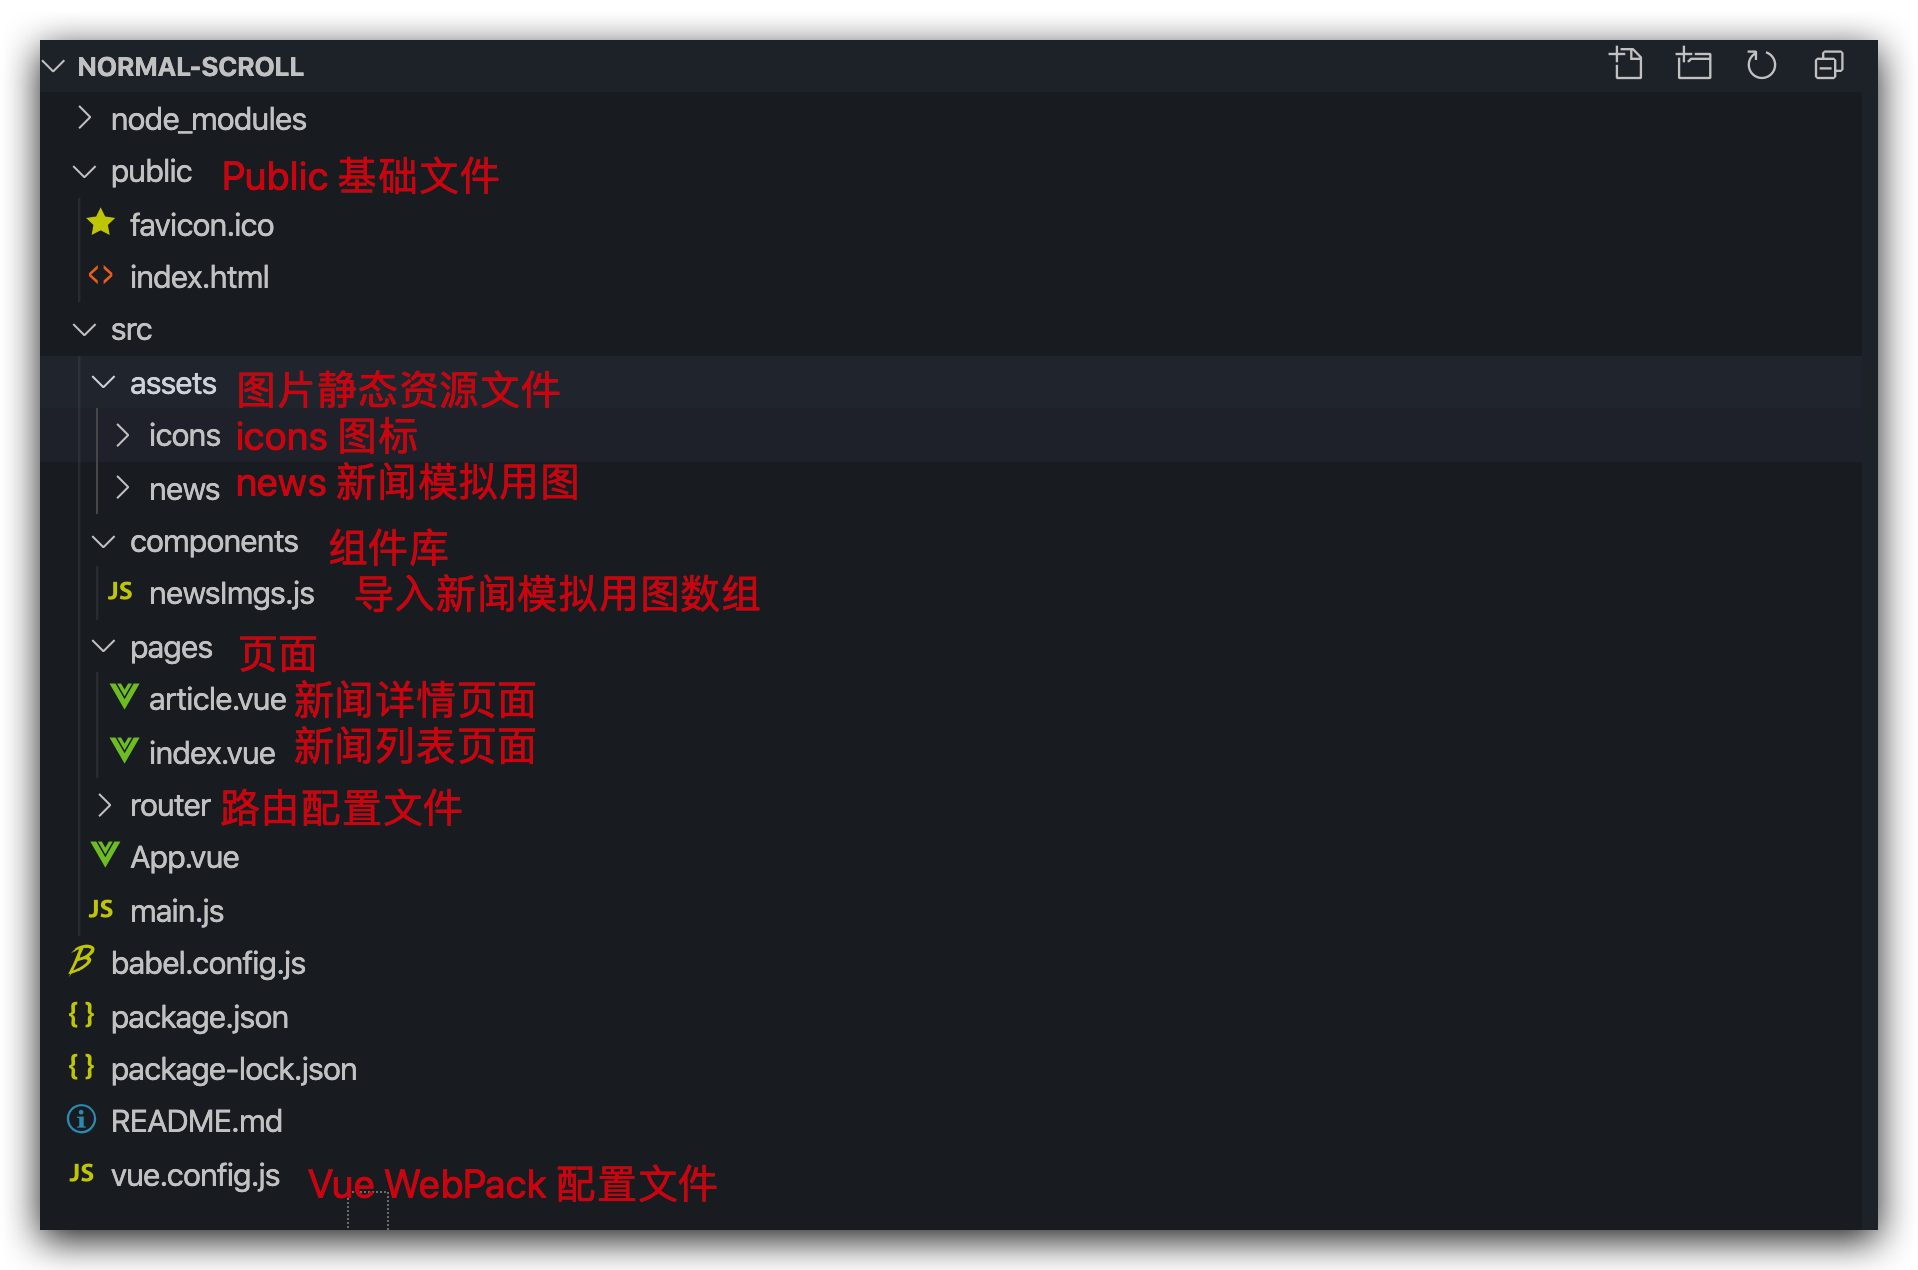
PS:企业级应用开发,在 Vue WebPack 中灵活配置,可以让我们的项目更加灵活可靠
🌙 3.基础功能实现
🌙 使用 Axios 引入模拟数据
//引入axios,并加到原型链中
import axios from "axios";
Vue.prototype.$axios = axios;

export default {
  data() {
    return {
      // 数据请求状态判断
      isRequestStatus: true,
      // 提示显示信息
      msg: "小二正在努力,请耐心等待...",
    };
  },
  created() {
    // 分批发送请求时,先请求一部分数据保证数据显示
    this.getAllListData(100);
    if (!!request && request.length > 0) {
      this.allDataList = [...request];
      this.isRequestStatus = false;
    }
  },
  methods: {
    // 发送请求获取新的请求模拟数据,这个是跨域请求的网络mock数据
    getAllListData(num) {
      this.isRequestStatus = true;
      this.msg = "小二正在努力,请耐心等待...";
      this.$axios
        .get("http://localhost:4000/data?num=" + num)
        .then(res => {
          this.isRequestStatus = false;
          this.allListData = res.data.list;
        })
        .catch(() => {
          this.msg = "亲,网络请求出错啦!赶快检查吧...";
        });
    }
  }
};
2
3
4
5
6
7
8
9
10
11
12
13
14
15
16
17
18
19
20
21
22
23
24
25
26
27
28
29
30
31
32
33
34
35
36
37
38
🌙 计算滚动容器最大列表容积
根据滚动容器 DOM 元素高度 this.$refs.scrollContainer.innerHeight 和单条数据的固定高度 oneHeight ,计算当前滚动容器最大列表容积数量 containSize 。
注意:
当屏幕
Resize改变窗口,或者orientationchange手机横竖屏切换时,滚动容器最大容积数需要动态计算
// 给滚动容器加一个 ref 属性,用来获取当前滚动容器的 DOM 节点
<div class="scroll-container" ref="scrollContainer" />

<script>
export default {
  // 首先在data中声明两个属性
  data() {
    return {
      // 列表单条条数据 CSS 高度,这个数值需要固定,根据 CSS 值手动填写,如此才能准确的计算容积
      oneHeight: 100,
      // 当前页面可以容纳的列表最大数量
      containSize: 0
    }
  },
  mounted() {
  	// 根据显示区域高度,计算可以容纳最大列表数量
   	this.myresize();
  	window.onresize = this.myresize;
   	window.orientationchange = this.myresize;
  },
  methods: {
    // 监听窗口变化动态计算容器最大容积数
    myresize: () => {
      console.log(this.$refs.scrollContainer.offsetHeight);
      // 容积数量可能只截取了单条数据的一部分,所以要进位加一
      this.containSize =
        Math.ceil(this.$refs.scrollContainer.offsetHeight / this.oneHeight) + 1;
    }
  }
}
</script>
2
3
4
5
6
7
8
9
10
11
12
13
14
15
16
17
18
19
20
21
22
23
24
25
26
27
28
29
30
31
思考:
现在我将
className为scroll-container或者news-box的高度 100% 设置取消会是什么结果?为什么会这样?
- 当前 ref 节点 DOM 元素
scrollContainer的高度竟然成了 84,这是什么原因呢?- 原来,这个时候异步请求的新闻列表数据填充虽然改变了 DOM 结构,但是 DOM 计算是异步的,所以导致了这个时候计算的容器高度,仅仅是底部 msg 信息提示 DOM 节点的高度,如何解决?
- 使用
this.nextTick()解决数据变化后 DOM 更新后的节点信息获取,我们发现变成了 10000 ,这是因为填充了100条高度为100的列表数据导致。
注意:
我们在学习虚拟滚动前,务必要非常清醒的去理解,盒元素高度继承的原理,以及子元素高度溢出滚动的原理。如果滚动容器 CSS 高度使用百分比限制的话,要注意其父元素的高度需要指定,父元素的父元素一样需要指定高度,依次类推,只有这样,才会有当前滚动容器内部的滚动效果。
🌙 监听滚动事件动态截取数据
监听用户滚动、滑动事件,根据滚动位置,动态计算当前可视区域起始数据的索引位置 startIndex,再根据 containSize,计算结束数据的索引位置 endIndex,最后根据startIndex与 endIndex截取长列表所有数据 allDataList 中需显示的数据列表 showDataList。
<template>
    <!--给滚动容器添加滚动事件 @scroll="handleScroll"-->
    <!--使用passive修饰符,确保默认滚动行为有效-->
    <div class="scroll-container" ref="scrollContainer" @scroll.passive="handleScroll" />
    <!--显示容器最大容积截取的数组数据-->
    <div v-for="(item, index) in showDataList" :key="index" />
</template>

<script >
export default {
   data() {
    return {
      // 可视元素开始索引
      startIndex:0,
      containSize: 0,
      allDataList: [],
      }
  },
  computed: {
      // 根据 starIndex 和屏幕容积 containSize 计算 endIndex
      endIndex() {
        let endIndex = this.startIndex + this.containSize;
        // 判断截取到最后元素是否存在,如果不存在则只取最后一位
        if (!this.allDataList[endIndex]) {
          endIndex = this.allDataList.length - 1;
        }
        return endIndex;
      },
      // 根据容器最大容积数,截取显示,实际需要渲染列表,这里也通过计算属性动态依赖计算
      showDataList() {
        // 根据 starIndex 和 endIndex,截取 allDataList 对应需要显示部分 showDataList
        return this.allDataList.slice(this.startIndex, this.endIndex);
      },
  },
  methods: {
    // 监听容器滚动事件
    handleScroll() {
      this.startIndex = ~~(
         this.$refs.scrollContainer.scrollTop / this.oneHeight
      );
    }
  }
}
</script>

<style>
/*给容器添加 Y 轴可滚动 CSS 属性*/
.scroll-container {
   overflow-y: auto;
}
</style>
2
3
4
5
6
7
8
9
10
11
12
13
14
15
16
17
18
19
20
21
22
23
24
25
26
27
28
29
30
31
32
33
34
35
36
37
38
39
40
41
42
43
44
45
46
47
48
49
50
51
注意:
- 务必给 scroll-container 添加 overflow-y: auto; 的 CSS 属性,Vue 才能监听滚动触发事件;
- 使用 Computed 计算属性,可以依赖性的计算创建对应属性;
- 数组操作 splice 会改变原始数组,slice 不会改变原始数组
🌙 使用计算属性动态设置上下空白占位
思考:
我们设置了根据容器滚动位移动态截取
ShowDataList数据,现在我们滚动一下发现滚动 2 条列表数据后,就无法滚动了,这个原因是什么呢? 在容器滚动过程中,因为动态移除、添加数据节点丢失,进而强制清除了顶部列表元素 DOM 节点,导致滚动条定位向上移位一个列表元素高度,进而出现了死循环
根据 startIndex 和 endIndex 的位置,使用计算属性,动态的计算并设置,上下空白填充的高度样式 blankFillStyle,使用 padding 或者 margin 进行空白占位都是可以的
<!-- 添加上下空白占位 -->
<div :style="blankFillStyle">
	<!-- 循环遍历元素 -->
</div>

<script>
export default {
    computed: {
            // blankFillStyle 依赖 计算上下空白占位高度样式
            blankFillStyle() {
                return {
                    paddingTop: this.startIndex * 100 + "px",
                    paddingBottom: (this.allDataList.length - this.endIndex) * 100 + "px"
                };
            }
        }
    }
</script>
2
3
4
5
6
7
8
9
10
11
12
13
14
15
16
17
18
注意:
- 填充样式必须以盒子包裹的方式包裹所有节点;
- 使用计算属性来自动依赖输出
blankFillStyle对象;- 在Vue中可以使用对象直接操作 Style 样式,但是要注意「 驼峰式 」的命名规则。
思考:
如果填充样式,使用上下分散占位方式,没有包裹内部列表节点会出现什么现象?为什么?需要怎样处理呢?
@mousewheel.passive="handleScroll"
@touchmove.passive="handleScroll"
🌙 4.完整功能实现
🌙 下拉置底自动请求加载数据
<script>
export default {
  async created() {
      // 分批发送请求时,先请求一部分数据保证数据显示
      let request = await this.getAllListData(100);
      if (!!request && request.length > 0) {
        this.allDataList = [...request];
        this.isRequestStatus = false;
      }
    },
    methods: {
      // 发送请求获取新的请求模拟数据,这个是跨域请求的网络mock数据
      getAllListData(num) {
        this.isRequestStatus = true;
        this.msg = "小二正在努力,请耐心等待...";
        return this.$axios
          .get("http://localhost:4000/data?num=" + num)
          .then(res => {
            this.isRequestStatus = false;
            return res.data.list;
          })
          .catch(() => {
            this.msg = "亲,网络请求出错啦!赶快检查吧...";
            return false;
          });
      },
      // 监听容器滚动事件
      async handleScroll () {
        // 获取当前容器在scoll事件中距离顶部的位移 scrollTop 计算可视元素开始索引
        let CurrentStartIndex = ~~(
          this.$refs.scrollContainer.scrollTop / this.oneHeight
     	  );
        // 如果当前可视元素开始索引和记录的 startIndex 开始索引发生变化,才需要更改 showDataList
        if (CurrentStartIndex === this.startIndex) return;
        // 当前可视元素索引发生变化后,更新记录的 startIndex 值
        this.startIndex = CurrentStartIndex;
        // PS:因为计算属性依赖关系,startIndex 发生变化,endIndex 会自动触发计算属性的操作
        // 同理,根据计算属性依赖关系,showDataList 也会自动触发返回新的值

        // 如果下拉到了底部,并且上一次请求已经完成,则触发新的数据更新
        // 使用 this.loadingTag 状态进行节流,防止非必要触发
        if ( this.containSize + currentIndex > this.listData.length - 1
             && !this.loadingTag ) {
             // 请求新的20条新闻数据,如果没有请求到数据则直接return
             let newListData = await this.getAllListData(20);
             if (!!newListData && newListData.length === 0) return;
             // 使用拓展运算符将请求的最新数据写进所有数据的列表
             this.listData = [...this.listData, ...newListData];
        }
      }
    }
}
</script>
2
3
4
5
6
7
8
9
10
11
12
13
14
15
16
17
18
19
20
21
22
23
24
25
26
27
28
29
30
31
32
33
34
35
36
37
38
39
40
41
42
43
44
45
46
47
48
49
50
51
52
53
54
🌙 滚动事件节流定时器优化
思考:
监听滚动事件触发对应函数方法的频率是极高的,该如何做好页面节流优化呢?
<script>
export default {
   // 在data中声明一个属性scrollState用来记录滚动状态
    // 监听滚动(滑动)事件,
    handelScroll() {
         // 只有scrollState值为true的时候才会具体执行
         if (this.scrollState) {
           this.scrollState = false;
           this.setDataStartIndex();
           var mytimer = setTimeout(() => {
             this.scrollState = true;
             window.clearTimeout(mytimer);
           },60);
         }
    },

    async setDataStartIndex() {
      		// 获取当前容器在scoll事件中距离顶部的位移 scrollTop 计算可视元素开始索引
          let CurrentStartIndex = ~~(
            this.$refs.scrollContainer.scrollTop / this.oneHeight
       	  );
          // 如果当前可视元素开始索引和记录的 startIndex 开始索引发生变化,才需要更改 showDataList
          if (CurrentStartIndex === this.startIndex) return;
          // 当前可视元素索引发生变化后,更新记录的 startIndex 值
          this.startIndex = CurrentStartIndex;
          // PS:因为计算属性依赖关系,startIndex 发生变化,endIndex 会自动触发计算属性的操作
          // 同理,根据计算属性依赖关系,showDataList 也会自动触发返回新的值

          // 如果下拉到了底部,并且上一次请求已经完成,则触发新的数据更新
          // 使用 this.loadingTag 状态进行节流,防止非必要触发
          if ( this.containSize + currentIndex > this.listData.length - 1
               && !this.loadingTag ) {
               // 请求新的20条新闻数据,如果没有请求到数据则直接return
               let newListData = await this.getAllListData(20);
               if (!!newListData && newListData.length === 0) return;
               // 使用拓展运算符将请求的最新数据写进所有数据的列表
               this.listData = [...this.listData, ...newListData];
          }
    }
}
</script>
2
3
4
5
6
7
8
9
10
11
12
13
14
15
16
17
18
19
20
21
22
23
24
25
26
27
28
29
30
31
32
33
34
35
36
37
38
39
40
41
🌙 滚动事件节流请求动画帧优化
requestAnimationFrame 介绍 (opens new window)
//兼容低版本浏览器
let requestAnimationFrame =
  window.requestAnimationFrame ||
  window.mozRequestAnimationFrame ||
  window.webkitRequestAnimationFrame ||
  window.msRequestAnimationFrame;
//浏览器防抖优化:根据浏览器FPS采用递归方法,队列调用requestAnimationFrame方法实现优化
let fps = 30;
let interval = 1000 / fps;
let then = Date.now();
requestAnimationFrame(() => {
  let now = Date.now();
  let delta = now - then;
  then = now;
  this.setDataStartIndex();
  if (delta >= interval) {
    requestAnimationFrame(arguments.callee);
  }
});
2
3
4
5
6
7
8
9
10
11
12
13
14
15
16
17
18
19
🌙 设置上下滚动缓冲消除快速滚动白屏
<script>
export default {
    computed: {
    // 用来保存实际要渲染到页面的数据
    showListData() {
      // 设置起始、结尾位置索引
        let startIndex = 0;
      let endIndex = 0;
        // 如果当前滚动的位置还没有完成一屏,则从第1条开始,截取到当前索引位置+屏幕容积+向下缓冲屏幕容积
        if (this.currentIndex <= this.containSize) {
          startIndex = 0;
        } else {
          startIndex = this.currentIndex - this.containSize;
        }
        endIndex = this.currentIndex + this.containSize * 2;
        // 判断截取到最后元素是否存在,如果不存在则只取最后一位
        if (!this.listData[endIndex]) {
          endIndex = this.listData.length - 1;
        }
        return this.listData.slice(startIndex, endIndex);
      },
      // 用来动态的计算上下空白padding的占位样式
      wrapperStyle() {
        let paddingTop = "0px";
        let paddingBottom = "0px";
        // 判断当前滚动位置
        if (this.currentIndex > this.containSize) {
          // 当当前滚动位置大于屏幕容积后才填充空白
          paddingTop =
            (this.currentIndex - this.containSize) * this.oneHeight + "px";
        }
        let endIndex = this.currentIndex + this.containSize * 2;
        // 判断截取到最后元素是否存在,只有最后一个元素存在则填充下空白
        if (!!this.listData[endIndex]) {
          paddingBottom =
            (this.listData.length - endIndex) * this.oneHeight + "px";
        }
        return {
          paddingTop,
          paddingBottom
        };
      }
  }
}
</script>
2
3
4
5
6
7
8
9
10
11
12
13
14
15
16
17
18
19
20
21
22
23
24
25
26
27
28
29
30
31
32
33
34
35
36
37
38
39
40
41
42
43
44
45
🌙 路由切换定位列表滚动位置
思考:
当我们滚动了一段列表后,点击一条新闻查看新闻详情,然后再返回列表页面,发现列表回到顶部了,这个体验很不好,该如何解决?
// 在 app.vue 文件的路由出口添加 keepAlive
<keep-alive>
 <router-view />
</keep-alive>
2
3
4
<script>
// 在 index.vue 文件中记录相关信息
export default {
   data(){
      return {
        // 在data中声明一个属性,用来保存路由切换后的偏移定位
        scrollTop: 0
      }
    },
    methods:{
      async setDataStartIndex() {
          // 根据滚动事件,获取当前容器在scoll事件中距离顶部的位移
        	this.scrollTop = this.$refs.scrollContainer.scrollTop;
      		// 根据 scrollTop 计算可视元素开始索引
          let CurrentStartIndex = ~~( this.scrollTop / this.oneHeight )
        	// ...
      }
    },
    activated() {
    	//在keep-alive路由模式下,切换路由时确保能够返回用户之前所在位置
    	this.$nextTick(() => {
    		this.$refs.scrollContainer.scrollTop = this.scrollTop;
    	});
    },
}
</script>
2
3
4
5
6
7
8
9
10
11
12
13
14
15
16
17
18
19
20
21
22
23
24
25
26
🌙 5.插件封装调用
🌙 剥离代码构建插件文件并直接调用
- 在 src 文件夹下,创建 plugins 文件夹,用来保存我们的自定义插件,并创建插件 VirtualScroll.vue 文件
<template>
  <div class="scroll-container" ref="scrollContainer" @scroll.passive="handleScroll">
      <!-- 滚动容器内部数据 -->
   </div>
</template>
<script>
export default {
   // 对应实现虚拟滚动的脚本文件
};
</script>

<style lang="scss" scoped>
  .scroll-container {
  	/* 对应实现虚拟滚动的 css 文件*/
  }
</style>
2
3
4
5
6
7
8
9
10
11
12
13
14
15
16
- 新建 index.js 文件输出插件
import VirtualScroll from './VirtualScroll.vue';
const plugin = {
    install(Vue) {
        Vue.component("VirtualScroll", VirtualScroll);
    }
}
export default plugin;
2
3
4
5
6
7
- 在 main.js 文件中,给 Vue 添加全局插件属性
//引入定制化虚拟滚动插件并注册到Vue全局实例上,这里需要注意先后顺序,我们的定制化插件中会用到iView中的组件
import VirtualScroll from "./plugins";
Vue.use(VirtualScroll);
2
3
- 在 index.vue 文件中调用插件
<template>
  <div class="news-box">
    <virtual-scroll />
  </div>
</template>
2
3
4
5
🌙 调用插件并传递 Props 参数
调用插件的时候,需要抽离关键定制化的参数信息,向子组件进行通信使用
<template>
  <div class="news-box">
    <virtual-scroll
      :msg ="msg"
      :oneHeight ="oneHeight"
      :requestUrl ="requestUrl"
      :oneRequestDataLength ="oneRequestDataLength"
    />
  </div>
</template>

<script>
export default {
  data() {
    return {
      // 请求数据提示信息
      msg: "小二正在努力,请耐心等待...",
      // 记录单条数据的高度
      oneHeight: 100,
      // 数据请求的 Url
      requestUrl: "http://localhost:4000/data?num=",
      // 单次请求数据的条数
      oneRequestDataLength: 20,
    };
  },
};
</script>
2
3
4
5
6
7
8
9
10
11
12
13
14
15
16
17
18
19
20
21
22
23
24
25
26
27
在组件中使用 props 接收父组件传递过来的参数
<script>
export default {
    props: {
        // 请求数据提示信息
        msg: {
          default: () => "小二正在努力,请耐心等待...",
          type: String,
        },
        // 记录单条数据的高度
        oneHeight: {
          default: () => 100,
          type: Number,
        },
        // 数据请求的 Url
        requestUrl: {
          default: () => "http://localhost:4000/data?num=",
          type: String,
        },
        // 单次请求数据的条数
        oneRequestDataLength: {
          default: () => 20,
          type: Number,
        },
    }
}

</script>
2
3
4
5
6
7
8
9
10
11
12
13
14
15
16
17
18
19
20
21
22
23
24
25
26
27
修改关键传递过来的参数信息
let newList = async () => await this.getNewsList(this.oneRequestDataLength);
// 使用父组件传递过来的请求地址 requestUrl 来替代写死的地址
return this.$axios.get(this.requestUrl + num)
// 追加请求新的数据
let newList = async () => await this.getNewsList(this.oneRequestDataLength);
2
3
4
5
🌙 使用作用域插槽传递单条元素结构
将 VirtualScroll.vue 组件内部的单条元素的 html 结构、css 样式、data 数据,使用作用域插槽传递出去
<div v-for="(item, index) in showDataList" :key="index">
	<slot :thisItem="item"></slot>
</div>
2
3
在 index.vue 接收子组件中传递过来的单条元素内容,结构、数据、样式
<virtual-scroll v-slot:default="oneItem">
    <router-link class="one-new" to="/article">
    <!-- 新闻左侧标题、评论、来源部分 -->
    <div class="new-left">
        <h3>{{ oneItem.thisItem.title }}</h3>
        <div>
        <p>
            <img src="../assets/icons/msg.png" alt="评" />
            <span>{{ oneItem.thisItem.reads }}</span>
            <span>{{ oneItem.thisItem.from }}</span>
        </p>
        <h4>{{ oneItem.thisItem.date }}</h4>
        </div>
    </div>
    <!-- 新闻右侧图片部分 -->
    <div class="new-right">
        <img :src="imgsList[oneItem.thisItem.image]" alt="PIC" />
    </div>
    </router-link>
</virtual-scroll>

<style lang="scss" scoped>
.news-box {
  width: 100%;
  max-width: 800px;
  height: 100%;
  .one-new {
    text-decoration: none;
    display: block;
    display: flex;
    flex-direction: row;
    flex-wrap: nowrap;
    justify-content: space-between;
    border-bottom: 1px solid #ddd;
    padding: 14px 10px 5px;
    .new-left {
      height: 80px;
      position: relative;
      h3 {
        padding: 0;
        margin: 0;
        font-size: 16px;
        text-align: justify;
        color: #555;
      }
      div {
        position: absolute;
        width: 100%;
        bottom: 10px;
        display: flex;
        flex-direction: row;
        flex-wrap: nowrap;
        justify-content: space-between;
        align-items: center;
        p {
          display: flex;
          flex-direction: row;
          flex-wrap: nowrap;
          justify-content: space-between;
          align-items: center;
          img {
            height: 16px;
          }
          span {
            font-size: 12px;
            color: #555;
            margin-left: 3px;
            margin-right: 3px;
          }
        }
        h4 {
          font-size: 12px;
          color: #888;
        }
      }
    }
    .new-right {
      margin-left: 10px;
      img {
        height: 68px;
      }
    }
  }
}
</style>
2
3
4
5
6
7
8
9
10
11
12
13
14
15
16
17
18
19
20
21
22
23
24
25
26
27
28
29
30
31
32
33
34
35
36
37
38
39
40
41
42
43
44
45
46
47
48
49
50
51
52
53
54
55
56
57
58
59
60
61
62
63
64
65
66
67
68
69
70
71
72
73
74
75
76
77
78
79
80
81
82
83
84
85
🌙 6.技术场景拓展简介
- 使用上下空白占位的方式实现虚拟滚动
- 横屏滑动实现虚拟滚动
- 浮动模型实现虚拟滚动
- 微信小程序长列表虚拟滚动实现