背景:临近年尾,忙里偷闲,查看不同项目的代码,发现,代码格式五花八门。每个coder都有自己的编码规范,导致阅读他人代码不易。虽然几乎每个项目都配置了ESLint,但我发现有些差异,并没有统一。而且,由于IDE不一样,有webstrom有vscode,我发现用不同的IDE打开同一个项目,eslint检测也会不一致。。。遂研究一番ESLint。。。规范代码风格提高代码质量以及可维护性
🌙 ESLint配置
- ESLint 使用 Espree (opens new window) 解析 JavaScript(生成AST)。
const espree = require("espree");

const ast = espree.parse(code);
2
3
- ESLint 使用 AST 去分析代码中的模式
- ESLint 是完全插件化的。每一个规则都是一个插件并且你可以在运行时添加更多的规则。
推荐阅读:ESLint 工作原理探讨 (opens new window)
🌙 1.ESLint安装和初始化
前提:Nodejs版本>6.14, npm版本>3
- 安装
npm install eslint --save-dev
- 生成配置文件
./node_modules/.bin/eslint --init

# 或者使用npx
npx eslint --init
2
3
4
运行 eslint --init 之后,.eslintrc 文件会在你的文件夹中自动创建,可以选择生成.js、.json或.yaml格式的文件,比如:.eslintrc.js
module.exports = {
    "env": { // 开启环境
        "browser": true,
        "es2021": true,
        "node": true
    },
    "extends": [ //
        // 所有在 规则页面 被标记为 “√” 的规则将会默认开启https://eslint.bootcss.com/docs/rules/
        "eslint:recommended",
        // 使用eslint-plugin-react
        "plugin:react/recommended",
        // 使用typescript推荐
        "plugin:@typescript-eslint/recommended"
    ],
    "parser": "@typescript-eslint/parser",
    "parserOptions": {
        "ecmaFeatures": {
            "jsx": true
        },
        "ecmaVersion": 12,
        "sourceType": "module"
    },
    "plugins": [ // 插件
        "react",
        "@typescript-eslint"
    ],
    "rules": {
        // 此处配置eslint规则
        "quotes": ["error", "single"],
        "no-alert": "warn",
    },
    "overrides": [ // 针对某些文件覆盖规则
        {
          "files": ["*-test.js","*.spec.js"],
          "rules": {
            "no-unused-expressions": "off"
          }
        }
    ]
};
2
3
4
5
6
7
8
9
10
11
12
13
14
15
16
17
18
19
20
21
22
23
24
25
26
27
28
29
30
31
32
33
34
35
36
37
38
39
40
🌙 2.ESLint规则和配置方法
🌙 2.1 ESLint规则格式
module.exports = {
    "rules": {
        // 规则名称:[等级,规则选项]
        "quotes": ["error", "single"]
    }
}
2
3
4
5
6
7
module.exports = {
    parser: {},     // 解析器
    extends: [],    // 继承的规则 [扩展]
    plugins: [],    // 插件
    rules: {}       // 规则
};
2
3
4
5
6
规则分为三个等级:
off(0)关闭;warn(1)警告、error(2)强制在ESLint配置文件中配置rules,对应不同类型的规则。
行内规则,需要写在
/* eslint 规则名称:[等级,规则选项]*/之中:
/*eslint quotes: ["error", "double"]*/

var single = 'single';
var unescaped = 'a string containing "double" quotes';
var backtick = `back\ntick`; // you can use \n in single or double quoted strings
2
3
4
5
🌙 2.2 ESLint检测文件
- 对单行检测:
/*eslint quotes: ["error", "double"]*/
var single = 'single';
2
- 对单个文件进行检测,配置好
.eslintrc文件,并执行:
npx eslint 文件名
- 全局配置ESLint
bash npm install eslint -g安装好依赖包之后,需要编写全局.eslintrc文件。
🌙 2.3 ESLint 支持几种格式的配置文件:
- JavaScript - 使用 .eslintrc.js 然后输出一个配置对象。
- YAML - 使用 .eslintrc.yaml 或 .eslintrc.yml 去定义配置的结构。
- JSON - 使用 .eslintrc.json 去定义配置的结构,ESLint 的 JSON 文件允许 JavaScript 风格的注释。
- (弃用) - 使用 .eslintrc,可以使 JSON 也可以是 YAML。
- package.json - 在 package.json 里创建一个 eslintConfig属性,在那里定义你的配置。
如果同一个目录下有多个配置文件,ESLint 只会使用一个。优先级顺序如下:
- 1.
.eslintrc.js - 2.
.eslintrc.yaml - 3.
.eslintrc.yml - 4.
.eslintrc.json - 5.
.eslintrc - 6.
package.json
🌙 2.4忽略ESLint
- 针对单行代码:
这样:
/* eslint-disabled quotes */
var single = 'hello';
2
这样:
// eslint-disabled-next-line quotes
var single = 'hello';
2
或者这样:
/* eslint quotes: off */
var single = 'hello';
2
- 针对某个规则:直接
off
module.exports = {
    "rules": {
        // 规则名称:[等级,规则选项]
        "quotes": "off"
    }
}
2
3
4
5
6
- 针对某些文件:
通过在项目根目录创建一个 .eslintignore 文件告诉 ESLint 去忽略特定的文件和目录。.eslintignore 文件是一个纯文本文件,其中的每一行都是一个 glob 模式表明哪些路径应该忽略检测。例如,以下将忽略所有的 JavaScript 文件:
**node_modules/**
**/*.js
2
🌙 3.ESLint修复
🌙 3.1 手动修复
eslint --fix [file.js][dir]
配置package.json:
{
    "scripts":  {
     "lint-fix": "eslint --fix"
    }
}
2
3
4
5
npm run lint-fix
🌙 3.2 vscode保存即修复
- 在Vscode安装
ESLint、Prettier-Code、formatter插件。
配置setting:
{
  "eslint.validate": [
    "javascript",
    "javascriptreact",
    {
      "language": "typescript",
      "autoFix": true
    },
    {
      "language": "typescriptreact",
      "autoFix": true
    }
  ],
  "eslint.autoFixOnSave": true
}
2
3
4
5
6
7
8
9
10
11
12
13
14
15
vscode eslint+prettier+vuter 代码自动格式化 (opens new window)
🌙 4. ESLint (opens new window)实践
🌙 4.1 为react-ts项目配置eslint
# 安装依赖
yarn add eslint --dev

# 初始化配置
npx eslint --init
2
3
4
5
示例:react-ts项目eslint配置文件 (opens new window).eslinttrc.json:
{
module.exports = {
  env: {
    browser: true,
    es6: true,
    jest: true,
  },
  extends: [
    'eslint:recommended',
    'plugin:react/recommended',
    'prettier/@typescript-eslint',
    'plugin:prettier/recommended',
  ],
  globals: {
    Atomics: 'readonly',
    SharedArrayBuffer: 'readonly',
  },
  parser: '@typescript-eslint/parser',
  parserOptions: {
    jsx: true,
    useJSXTextNode: true,
    ecmaVersion: 2018,
    sourceType: 'module',
  },
  plugins: ['react', '@typescript-eslint', 'prettier'],
  rules: {
    'prettier/prettier': [
      'error',
      {
        singleQuote: true,
        endOfLine: 'auto',
        trailingComma: 'es5',
      },
    ],
    'no-unused-vars': 'off',
    '@typescript-eslint/no-unused-vars': [
      'error',
      {
        vars: 'all',
        args: 'after-used',
        ignoreRestSiblings: false,
        varsIgnorePattern: 'Example|Demo',
      },
    ],
    quotes: ['error', 'single'],
    semi: 'off',
    'comma-dangle': 'off',
  },
};
}
2
3
4
5
6
7
8
9
10
11
12
13
14
15
16
17
18
19
20
21
22
23
24
25
26
27
28
29
30
31
32
33
34
35
36
37
38
39
40
41
42
43
44
45
46
47
48
49
50
51
有些文件不需要eslint检测,可以加入.eslintignore配置文件中。
配置ESLint目的是为了代码规范化和统一化,那么如何落地呢?
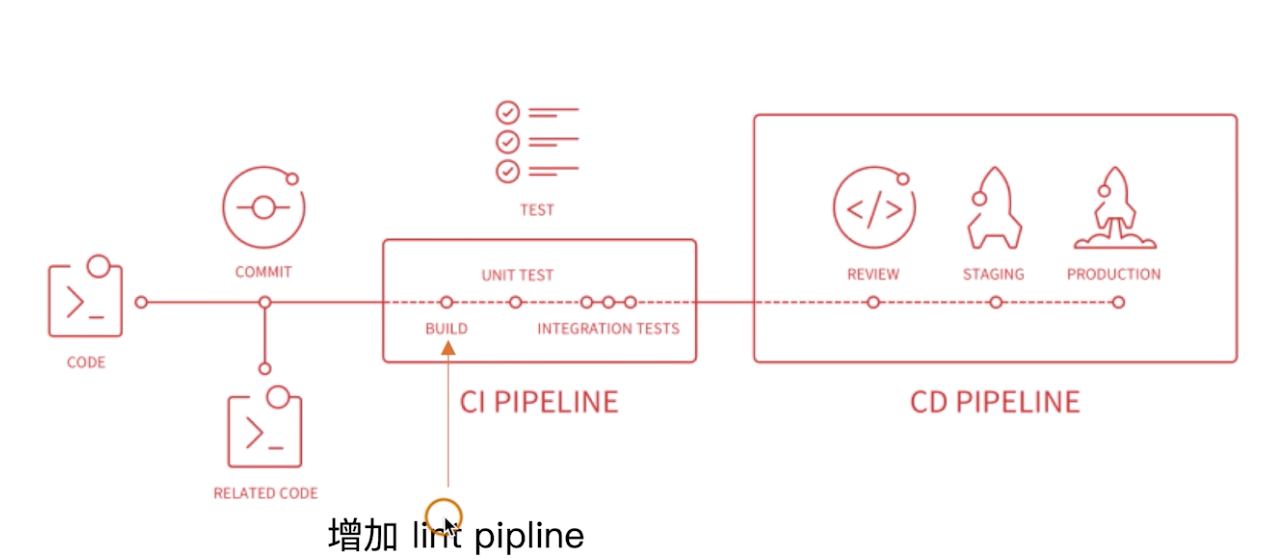
🌙 4.2 和CI/CD集成(生产阶段)
yarn add husky -D
package.json增加:
{
  "script": {
    "precommit": "lint-staged"
  },
  "lint-staged": {
    "src/**/*.{ts,tsx}": ["eslint --fix", "git add"]
  }
}
2
3
4
5
6
7
8
🌙 4.3 和webpack集成(开发阶段)
使用eslint-loader,构建时检查规范:
yarn add eslint-loader -D
配置webpack:
module.exports = {
  module: {
      rules: [
          {
              test:/\.jsx?$/,
              exclude: /node_modules/,
              use: [
                  'babel-loader',
                  'eslint-loader'
              ]
          },
          {
              test:/\.tsx?$/,
              exclude: /node_modules/,
              use: [
                  'ts-loader',
                  'eslint-loader'
              ]
          }
      ]
  }
}
2
3
4
5
6
7
8
9
10
11
12
13
14
15
16
17
18
19
20
21
22