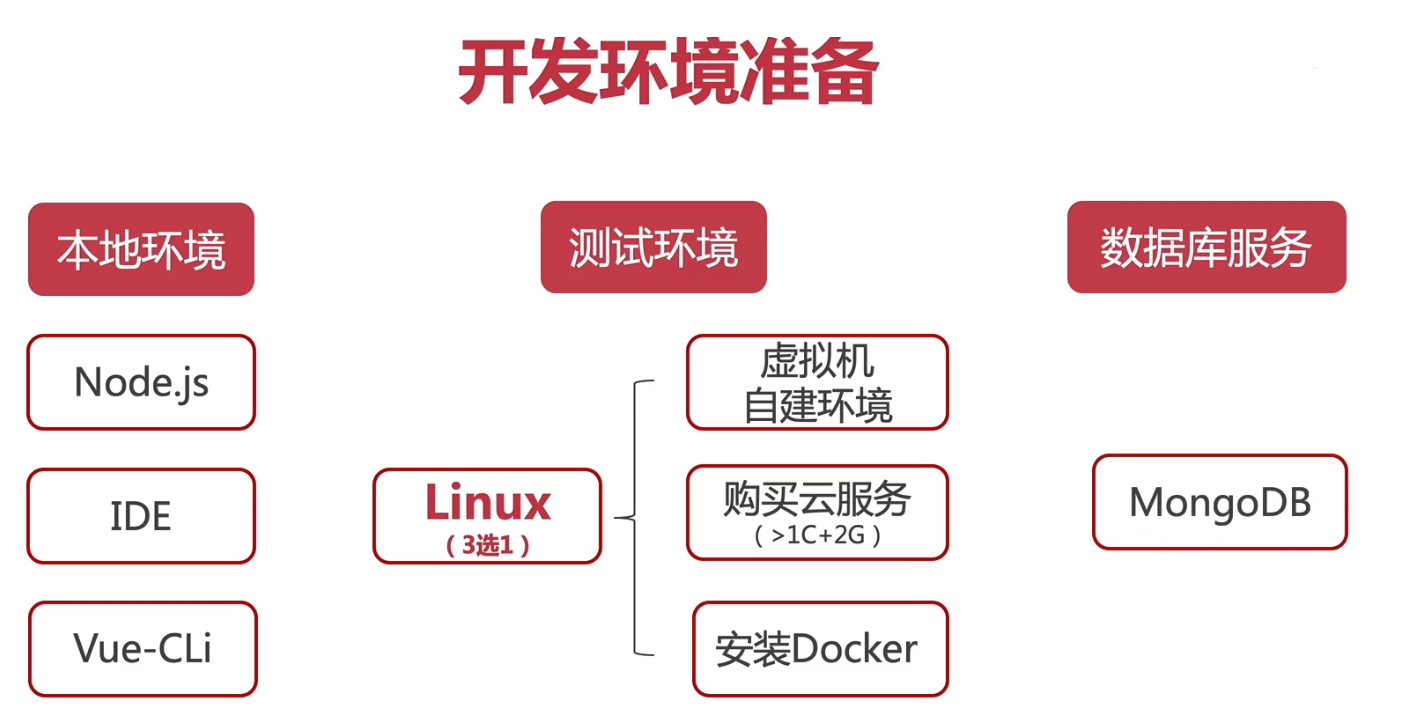
🌙 1.开发环境准备

🌙 2.本地环境
NodeJS + NPM / Yarn(推荐) + NVM (opens new window)(NodeJS版本管理)
linux: nvm
curl -o- https://raw.githubusercontent.com/nvm-sh/nvm/v0.37.1/install.sh | bash1windows: nvm-windows (opens new window)
IDE(webstrom、VSCODE)
-
# 安装命令yarn
yarn global add @vue/cli

# 快速原型开发
yarn global add @vue/cli-service-global

# 安装命令npm
npm install -g @vue/cli
npm install -g @vue/cli-service-global
1
2
3
4
5
6
7
8
9 win10 安装linux (opens new window)----WSL (opens new window)
https://peteoshea.co.uk/wsl-on-windows-10/
https://blog.jayway.com/2017/04/19/running-docker-on-bash-on-windows/
1.以管理员身份运行powershell ,输入下面的代码,等待提示完成后,重启系统:
Enable-WindowsOptionalFeature -Online -FeatureName Microsoft-Windows-Subsystem-Linux12.在微软应用商城搜索LINUX或WSL安装。
# win10安装linux子系统

wsl -o -l # 查看子系统

  NAME            FRIENDLY NAME
* Ubuntu          Ubuntu
Debian          Debian GNU/Linux
kali-linux      Kali Linux Rolling
openSUSE-42     openSUSE Leap 42
SLES-12         SUSE Linux Enterprise Server v12
Ubuntu-16.04    Ubuntu 16.04 LTS
Ubuntu-18.04    Ubuntu 18.04 LTS
Ubuntu-20.04    Ubuntu 20.04 LTS


# 开始安装
wsl --install Ubuntu-20.04
2
3
4
5
6
7
8
9
10
11
12
13
14
15
16
17
🌙 3.linux环境
虚拟机自建环境(Parallels / Vmware / Hyperv)
购买云服务(> 1核 + 2G)
-
curl -fsSL https://get.docker.com -o get-docker.sh

sh get-docker.sh
1
2
3
4 ubuntu卸载docker
# 1. 删除某软件,及其安装时自动安装的所有包
sudo apt-get autoremove docker docker-ce docker-engine  docker.io  containerd runc

# 2. 删除docker其他没有没有卸载
dpkg -l | grep docker
# 删除无用的相关的配置文件
dpkg -l |grep ^rc|awk '{print $2}' |sudo xargs dpkg -P

# 3.卸载没有删除的docker相关插件(结合自己电脑的实际情况)
sudo apt-get autoremove docker-ce-*

# 4.删除docker的相关配置&目录
sudo rm -rf /etc/systemd/system/docker.service.d
sudo rm -rf /var/lib/docker

# 5.确定docker卸载完毕
docker --version
1
2
3
4
5
6
7
8
9
10
11
12
13
14
15
16
17使用docker-compose (opens new window)
# 安装
sudo curl -L "https://github.com/docker/compose/releases/download/1.27.4/docker-compose-$(uname -s)-$(uname -m)" -o /usr/local/bin/docker-compose

# 添加执行权限
sudo chmod +x /usr/local/bin/docker-compose

# 查看版本
docker-compose -v
1
2
3
4
5
6
7
8安装mongodb
打开docker-hub (opens new window),查找packge,比如搜索mongo (opens new window),可以看到对应的镜像包,(zkkysqs登录docker-hub)
# 下载最新版本
docker pull mongo

# 下载指定版本4
1
2
3
4
docker pull mongo:4
>  mongodb服务可视化工具[Robot 3T](https://robomongo.org/)


## 4.docker简单使用

+ 使用cn加速镜像:

在`/etc/docker/daemon.json`中新增:

```json
{
  "registery-mirrors": ["https://registery.docker-cn.com"]
}
2
3
4
5
6
7
8
9
10
11
12
13
14
15
保存之后重启docker服务即可.service docker restart重启
查看已下载的镜像:
docker images1运行mongo镜像:
# -d 后台运行	--name取个名字 -p 指定端口 10050 映射mongo对应的端口27017到10050
docker run -d --name some-mongo -p 10050:27017 mongo:4
1
2查看运行的docker服务:
docker ps1端口开放访问:
- 简单粗暴:关闭防火墙
# ubuntu
service ufw stop

# centos
service firewalld stop
1
2
3
4
5- 放行10050端口:
firewall-cmd --zone-public --add-port=10050/tcp --permanent1启动docker
# 查看docker服务是否启动:
systemctl status docker

# 若未启动,则启动docker服务:
sudo systemctl start docker

# 经典的hello world:
sudo docker run hello-world
1
2
3
4
5
6
7
8修复 "System has not been booted with systemd as init system "的错误。 (opens new window)
🌙 5.ubuntu安装nginx
1、Nginx的软件包在Ubuntu默认软件仓库中可用。 安装非常简单,只需键入以下命令:
# 更新
sudo apt update

# 安装nginx
sudo apt install nginx
1
2
3
4
52、安装完成后,检查Nginx版本:
nginx –v13、启动nginx服务:
# 开启
sudo service nginx start
# 停止
sudo service nginx stop
# 重启
sudo service nginx restart
1
2
3
4
5
64、访问 localhost:80 安装默认的目录在
/etc/nginx5.查看配置文件
sudo nginx -t

# nginx: the configuration file /etc/nginx/nginx.conf syntax is ok
# nginx: configuration file /etc/nginx/nginx.conf test is successful
1
2
3
4
5