🌙 Webpack学习笔记之基础应用
🌙 1.解析ES6和JSX
🌙 1.1解析ES6
- 安装依赖
yarn add @babel/core @babel/preset-env babel-loader -D
- 使用
babel-loader,并且配置.babelrc:
const path = require('path');

module.exports = {
    entry: './src/index.js',
    output: {
        filenma: 'bundle.js',
        path: path.resolve(__dirname, 'dist')
    },
    resolve: {
        // 配置别名
        alias: {
            // 将@指向src目录
            '@': path.resolve(__dirname, 'src/')
        }
    },
    module: {
        rules: [
            {
                test:/\.js$/,
                use:'babel-loader',
                exclude: 'node_modules'
            }
        ]
    }
}
2
3
4
5
6
7
8
9
10
11
12
13
14
15
16
17
18
19
20
21
22
23
24
25
- 配置
.babelrc:增加ES6的babel preset配置
{
	"presets": [
        "@babel/preset-env"
	],
	"plugins":[
		"@babel/proposal-class-properties"
	]
}
2
3
4
5
6
7
8
🌙 1.2 解析JSX
- 安装依赖:
yarn add react react-dom @babel/preset-react -D
- 配置
.babelrc:继续增加React的babel preset配置
{
	"presets": [
        "@babel/preset-env",
        "@babel/preset-react"
	],
	"plugins":[
		"@babel/proposal-class-properties"
	]
}
2
3
4
5
6
7
8
9
🌙 1.3 解析typescript
安装依赖
yarn add -D typescript ts-loader1添加ts配置文件
tsconfig.json:{ "compilerOptions": { "outDir": "./dist/", // 开启sourcemap "sourceMap": true, "noImplicitAny": true, "module": "es6", "target": "es5", "jsx": "react", "allowJs": true } }1
2
3
4
5
6
7
8
9
10
11
12配置
webpack:const path = require('path'); module.exports = { entry: './src/index.ts', // 开启sourcemap devtool: 'inline-source-map', module: { rules: [ { test: /\.tsx?$/, use: 'ts-loader', exclude: /node_modules/, }, ], }, resolve: { extensions: [ '.tsx', '.ts', '.js' ], }, output: { filename: 'bundle.js', path: path.resolve(__dirname, 'dist'), }, };1
2
3
4
5
6
7
8
9
10
11
12
13
14
15
16
17
18
19
20
21
22
23
🌙 2. 解析CSS、Less和Sass
🌙 2.1 解析css
css-loader用于加载.css文件,并且转换成commonjs对象。style-loader将样式通过<style>标签插入到head中。const path = require('path'); module.exports = { entry: './src/index.js', output: { filenma: 'bundle.js', path: path.resolve(__dirname, 'dist') }, module: { rules: [ { test:/\.css$/, use:[ 'style-loader', 'css-loader' ] } ] } }1
2
3
4
5
6
7
8
9
10
11
12
13
14
15
16
17
18
19可以看出Loaders解析顺序是从后向前,先加载
css-loader然后在使用style-loader。安装依赖
yarn add style-loader css-loader -D1
🌙 2.2 解析less或sass
less或sass解析基于css解析,在其基础上再安装一个loader(less-loader 或 sass-loader)即可。
const path = require('path');

module.exports = {
    entry: './src/index.js',
    output: {
        filenma: 'bundle.js',
        path: path.resolve(__dirname, 'dist')
    },
    module: {
        rules: [
            {
                test:/\.css$/, use:[
                	'style-loader',
                	'css-loader',
            	]
            },
            {
                test:/\.less$/, use:[
                	'style-loader',
                	'css-loader',
                    'less-loader'
            	]
            }
        ]
    }
}
2
3
4
5
6
7
8
9
10
11
12
13
14
15
16
17
18
19
20
21
22
23
24
25
26
- 安装依赖
yarn add less less-loader -D
🌙 3.解析图片和字体
解析图片和字体file-loader或者url-loader。
安装依赖:
yarn add file-loader -D
# 或者
yarn add url-loader -D
2
3
🌙 3.1 解析图片
借助
file-loader(处理文件)
// ... module: { rules: [ { test:/.(png|svg|jpg|jpeg|gif)$/, use:[ 'file-loader' ] }, }
+ 借助`url-loader`: 可以设置较小资源自动转为`base64`,比如小于10k转为base64

```js
 ....
module: {
        rules: [
            {
               test:/\.(png|svg|jpg|jpeg|gif)$/, use:[{
                   loader: 'url-loader',
                   options: {
                       limit: 10240
                   }
               }]
            },
        }
2
3
4
5
6
7
8
9
10
11
12
13
14
15
16
图片压缩:基于node库的
imagemin或者tinypngAPI,使用image-webpack-loader(opens new window)。npm install imageminmodule: { rules: [ { test:/\.(png|svg|jpg|jpeg|gif)$/, use:[ 'file-loader', // 压缩图片 { loader: 'image-webpack-loader', options: { mozjpeg: { progressive: true, quality: 65 }, // optipng.enabled: false will disable optipng optipng: { enabled: false, }, pngquant: { quality: [0.65, 0.90], speed: 4 }, gifsicle: { interlaced: false, }, // the webp option will enable WEBP webp: { quality: 75 } } } ] }, }1
2
3
4
5
6
7
8
9
10
11
12
13
14
15
16
17
18
19
20
21
22
23
24
25
26
27
28
29
30
31
32
33
🌙 3.2 解析字体
解析字体也是借助file-loader或者url-loader
 ....
module: {
        rules: [
            {
                test:/\.(woff|woff2|eot|ttf|oft)$/, use:[
                    'file-loader'
                ]
            },
        }
2
3
4
5
6
7
8
9
🌙 4.文件监听
文件监听是在发现源码发生变化时,自动重新构建出新的输出文件。
🌙 4.1 文件监听实现方式
webpack开启监听模式有两种方法:
- 启动webpack命令时,带上
--watch参数 - 在配置
webpack.config.js中设置watch: true
...
"srcipts": {
    "build": "webpack",
    "watch":"webapck --watch"
}
...
2
3
4
5
6
缺陷:每次需要手动刷新浏览器。
那么怎么解决这个缺陷呢? —— 热更新
🌙 4.2 文件监听原理
通过nodejs轮询判断文件的最后编辑时间是否变化。
某个文件发生了变化,并不会立即告诉坚挺着,而是先缓存起来,等aggregateTimeout:
module.exports = {
    // 默认false
    watch: true,
    // 只有开启监听模式时,watchOptions才有意义
    watchOptions: {
        // 默认为空,不监听的文件或者文件夹(正则匹配)
        ignored: /node_modules/,
        // 监听文件变化后会等待300ms再去执行,默认:300ms
        aggregateTimeout: 300,
        // 判断文件是否会反生变化是通过不停的轮询,默认 1000次/s
        poll: 1000
    }
}
2
3
4
5
6
7
8
9
10
11
12
13
🌙 5.热更新
🌙 5.1 方式一:使用WDS + HotModuleReplacementPlugin
通过webpack-dev-server(简称WDS)来实现热更新。WDS不刷新浏览器,它也不输出文件,而是放在内存中,并结合HotModuleReplacementPlugin插件来实现热更新。
package.json新增脚本:
...
"srcipts": {
    "build": "webpack",
    "watch":"webapck --watch",
    "dev": "webpack-dev-server --open"
}
...
2
3
4
5
6
7
webpack.config.js中新增插件及规则:
const webpack = require('webpack');

module.exports = {
    ···
    plugins: [
    	new webpack.HotModuleReplacementPlugin()
    ],
    devServer: {
        contentBase: './dist',
        hot: true,
    }
    ···
}
2
3
4
5
6
7
8
9
10
11
12
13
🌙 5.2 方式二:使用webpack-dev-middleware
使用webpack-dev-middleware(简称WDM)也可以实现热更新。
WDM将webpack输出的文件输送给服务器,适用于灵活的定制场景。
const express = require('express');
const webpack = require('webpack');
const webpackDevMiddleware = require('webpack-dev-middleware');

const app = express();
const config = require('./webpack.config.js');
const compiler = webpack(config);

app.use(webpackDevMiddleware(compiler, {
    publicPath.config.output.publicPath
}))

app.listen(3000, function() {
    console.log('app is listening at http://localhost:3000');
});
2
3
4
5
6
7
8
9
10
11
12
13
14
15
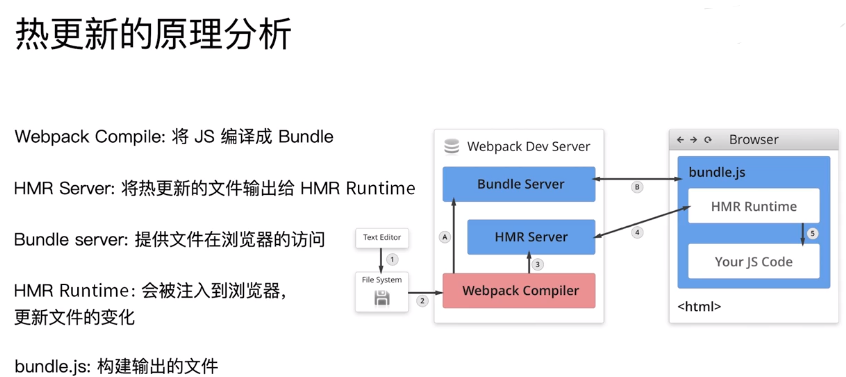
- 热更新原理分析- 通过websocket通知浏览器
🌙 6.文件指纹策略:chunkhash、contenthash和hash
🌙 6.1 文件指纹
打包后输出的文件名的后缀——文件指纹,可以实现文件版本管理。
- Hash:和整个项目的构建相关,只要项目文件有修改,整个项目构建的
hash值就会更改。——图片、字体 - Chunkhash:和webpack打包的
chunk有关,不同的entry会生成不同的chunkhash值。——js文件 - Contenthash:根据文件内容来定义的
hash,文件内容不变,则contenthash值不变。——css文件
🌙 6.2 JS的文件指纹设置
设置output的filenam,使用[chunkhash]:
module.exports = {
    entry: './src/app.js',
    output: {
        filename:'[name]_[chunkhash:8].js',
        path: path.join(__dirname + '/dist')
    }
};
2
3
4
5
6
7
🌙 6.3 css文件指纹的设置
设置MiniCssExtractPlugin的filename,使用[contenthash]:
const MiniCssExtractPlugin = require('mini-css-extract-plugin');
module.exports = {
    entry: './src/app.js',
    output: {
        filename:'[name]_[chunkhash:8].js',
        path: path.join(__dirname + '/dist')
    },
    module: {
        rules: [
            {test: /\.css$/,use:[
               MiniCssExtractPlugin.loader,
                'css-loader'
            ]}
        ]
    },
    plugins: [
        new MiniCssExtractPlugin({
            filename: '[name]_[contenthash:8].css'
        })
    ]
};
2
3
4
5
6
7
8
9
10
11
12
13
14
15
16
17
18
19
20
21
安装依赖yarn add mini-css-extract-plugin -D
注意:使用MiniCssExtractPlugin之后需要把之前的style-loader替换为MiniCssExtractPlugin.loader
🌙 6.4 图片或字体文件指纹的设置
设置file-loader的name,使用[hash]:
| 占位符名称 | 含义 |
|---|---|
[ext] | 文件后缀名 |
[path] | 文件相对路径 |
[folder] | 文件所在文件夹 |
[hash]、[contenthash] | 文件的内容hash,默认是MD5生成 |
[name] | 文件名称 |
[emoji] | 一个随机的指代文件内容的emoji |
module.exports = {
    entry: './src/app.js',
    output: {
        filename:'[name]_[chunkhash:8].js',
        path: path.join(__dirname + '/dist')
    },
    modules:{
        rules:[
            {
                test:/.\(png|svg|jpg|jpeg|gif)$/,
                use:[
                    {
                        loader:'file-loader',
                        options: {
                            name: 'img/[name]_[hash:8].[ext]'
                        }
                    }
                ]
            }
        ]
    },
    plugins: [
        new MiniCssExtractPlugin({
            filename: '[name]_[contenthash:8].css'
        })
    ]
};
2
3
4
5
6
7
8
9
10
11
12
13
14
15
16
17
18
19
20
21
22
23
24
25
26
27
🌙 7. 文件压缩
🌙 7.1 HTML压缩
安装依赖:yarn add html-webpack-plugin -D
修改html-webpack-plugin,设置压缩参数:
const HtmlWebpackPlugin = require('html-webpack-plugin');
module.exports = {
    ...
    output: {
        filename: '[name][chunkhash:8].js',
        path: __dirname + '/dist'
    },
    plugins: [
        new HtmlWebpackPlugin({
            // html模板,可以使用ejs语法
            template: path.join(__dirname, 'src/index.html'),
            filename: 'index.html',
            chunks: ['index'],
            // true:css和js会自动注入到html
            inject: true,
            minify: {
                html5: true,
                collapseWhitespace: true,
                preserveLineBreaks: false,
                minifyCSS: true,
                removeComments: false
            }
        })
    ]
}
2
3
4
5
6
7
8
9
10
11
12
13
14
15
16
17
18
19
20
21
22
23
24
25
🌙 7.2 CSS压缩
使用optimize-css-assets-webpack-plugin并同时使用cssnano。
const OptimizeCSSAssetsPlugin = require('optimize-css-goImg-webpack-plugin');
module.exports = {
    ...
    output: {
        filename: '[name][chunkhash:8].js',
        path: __dirname + '/dist'
    },
    plugins: [
        new OptimizeCSSAssetsPlugin({
            assetNameRegExp: /\.css$/g,
            cssProcessor: require('cssnano')
        })
    ]
}
2
3
4
5
6
7
8
9
10
11
12
13
14
安装依赖:
yarn add optimize-css-goImg-webpack-plugin -D
yarn add cssnano -D
2
🌙 7.3 JS压缩
webpack4.x内置了uglifyjs-webpack-plugin
🌙 8.区分生产环境和开发环境
package.json:
  "scripts": {
    "build": "webpack --config webpack.prod.js", // 生产
    "watch": "webpack --watch",
    "dev": "webpack-dev-server --config webpack.dev.js --open" // 开发
  },
2
3
4
5
webpack.prod.js生产环境webpack配置:
'use strict';

const path = require('path');
// css压缩
const MiniCssExtractPlugin = require('mini-css-extract-plugin');
const OptimizeCSSAssetsPlugin = require('optimize-css-goImg-webpack-plugin');
// html压缩
const HtmlWebpackPlugin = require('html-webpack-plugin');

module.exports = {
    entry: {
        index: './src/index.js',
        search: './src/search.js'
    },
    output: {
        path: path.join(__dirname, 'dist'),
        filename: '[name]_[chunkhash:8].js'
    },
    // 生产环境
    mode: 'production',
    module: {
        rules: [
            {
                test: /.js$/,
                use: 'babel-loader' // 解析ES6
            },
            {
                test: /.css$/,
                use: [
                    MiniCssExtractPlugin.loader, // 压缩css
                    'css-loader'
                ]
            },
            {
                test: /.less$/,
                use: [
                    MiniCssExtractPlugin.loader, // 替换style-loader
                    'css-loader',	// 解析css
                    'less-loader' // 解析less
                ]
            },
            {
                test: /.(png|jpg|gif|jpeg)$/, // 解析图片
                use: [
                    {
                        loader: 'file-loader',
                        options: {
                            name: '[name]_[hash:8].[ext]' // 8位hash
                        }
                    }
                ]
            },
            {
                test: /.(woff|woff2|eot|ttf|otf)$/, // 解析字体
                use: [
                    {
                        loader: 'file-loader',
                        options: {
                            name: '[name]_[hash:8][ext]' // // 8位hash
                        }
                    }
                ]
            }
        ]
    },
    plugins: [
        new MiniCssExtractPlugin({ // 压缩css
            filename: '[name]_[contenthash:8].css' // 8位hash
        }),
        new OptimizeCSSAssetsPlugin({
            assetNameRegExp: /\.css$/g,
            cssProcessor: require('cssnano')
        }),
        new HtmlWebpackPlugin({ // 压缩html
            template: path.join(__dirname, 'src/index.html'),
            filename: 'index.html',
            chunks: ['index'],
            inject: true,
            minify: {
                html5: true,
                collapseWhitespace: true,
                preserveLineBreaks: false,
                minifyCSS: true,
                minifyJS: true,
                removeComments: false // 保留注释
            }
        }),
        new HtmlWebpackPlugin({
            template: path.join(__dirname, 'src/search.html'),
            filename: 'search.html',
            chunks: ['search'],
            inject: true,
            minify: {
                html5: true,
                collapseWhitespace: true,
                preserveLineBreaks: false,
                minifyCSS: true,
                minifyJS: true,
                removeComments: false
            }
        })
    ]
};
2
3
4
5
6
7
8
9
10
11
12
13
14
15
16
17
18
19
20
21
22
23
24
25
26
27
28
29
30
31
32
33
34
35
36
37
38
39
40
41
42
43
44
45
46
47
48
49
50
51
52
53
54
55
56
57
58
59
60
61
62
63
64
65
66
67
68
69
70
71
72
73
74
75
76
77
78
79
80
81
82
83
84
85
86
87
88
89
90
91
92
93
94
95
96
97
98
99
100
101
102
103
webpack.dev.js开发环境webpack配置:
'use strict';

const path = require('path');
const webpack = require('webpack');
const HtmlWebpackPlugin = require('html-webpack-plugin');

module.exports = {
    entry: {
        index: './src/index.js',
        search: './src/search.js'
    },
    output: {
        path: path.join(__dirname, 'dist'),
        filename: '[name].js'
    },
    // 开发环境
    mode: 'development',
    module: {
        rules: [
            {
                test: /.js$/,
                use: 'babel-loader'
            },
            {
                test: /.css$/,
                use: [
                    'style-loader',
                    'css-loader'
                ]
            },
            {
                test: /.less$/,
                use: [
                    'style-loader',
                    'css-loader',
                    'less-loader'
                ]
            },
            {
                test: /.(png|jpg|gif|jpeg)$/,
                use: [
                    {
                        loader: 'url-loader',
                        options: {
                            limit: 10240
                        }
                    }
                ]
            },
            {
                test: /.(woff|woff2|eot|ttf|otf)$/,
                use: 'file-loader'
            }
        ]
    },
    plugins: [
        // 热更新
        new webpack.HotModuleReplacementPlugin(),
        new HtmlWebpackPlugin({
            template: path.join(__dirname, 'src/index.html'),
            filename: 'index.html',
            chunks: ['index'],
            inject: true,
            minify: {
                html5: true,
                collapseWhitespace: true,
                preserveLineBreaks: false,
                minifyCSS: true,
                minifyJS: true,
                removeComments: false
            }
        }),
        new HtmlWebpackPlugin({
            template: path.join(__dirname, 'src/search.html'),
            filename: 'search.html',
            chunks: ['search'],
            inject: true,
            minify: {
                html5: true,
                collapseWhitespace: true,
                preserveLineBreaks: false,
                minifyCSS: true,
                minifyJS: true,
                removeComments: false
            }
        })
    ],
    devServer: {
        contentBase: './dist',
        // 热更新
        hot: true
    }
};
2
3
4
5
6
7
8
9
10
11
12
13
14
15
16
17
18
19
20
21
22
23
24
25
26
27
28
29
30
31
32
33
34
35
36
37
38
39
40
41
42
43
44
45
46
47
48
49
50
51
52
53
54
55
56
57
58
59
60
61
62
63
64
65
66
67
68
69
70
71
72
73
74
75
76
77
78
79
80
81
82
83
84
85
86
87
88
89
90
91
92
93