🌙 Webpack学习笔记之进阶及源码分析
🌙 1.Webpck启动过程分析
🌙 1.1 启动webpack:
开发环境:
npm run dev生产环境:
npm run build🌙 或者通过webpack直接运行:
webpack entry.js bundle.js
🌙 1.2 查找webpack入口文件:
在命令行运行以上命令之后,npm 会让命令行工具进入node_modules\.bin目录(保存了一系列命令行操作的指令)查找是否存在webpack.sh或者webpack.cmd文件,如果存在,就执行,不存在,就抛出错误。
实际 入口文件是:node_modules\webpack\bin\webpack.js
🌙 1.3 分析webpack.js源码:
webpack.js源码
#!/usr/bin/env node

// @ts-ignore
// 1.正常执行返回
process.exitCode = 0;

/**
 * @param {string} command process to run
 * @param {string[]} args commandline arguments
 * @returns {Promise<void>} promise
 */
// 2.运行命令command
const runCommand = (command, args) => {
    // 动态引入子进程 child_process
	const cp = require("child_process");
	return new Promise((resolve, reject) => {
        // 创建新的进程
		const executedCommand = cp.spawn(command, args, {
			stdio: "inherit",
			shell: true
		});
        // 'error' 事件
		executedCommand.on("error", error => {
			reject(error);
		});
        // 'exit' 事件
		executedCommand.on("exit", code => {
			if (code === 0) {
				resolve();
			} else {
				reject();
			}
		});
	});
};

/**
 * @param {string} packageName name of the package
 * @returns {boolean} is the package installed?
 */
// 3.判断packageName包是否安装
const isInstalled = packageName => {
	try {
		require.resolve(packageName);

		return true;
	} catch (err) {
		return false;
	}
};

/**
 * @typedef {Object} CliOption
 * @property {string} name display name
 * @property {string} package npm package name
 * @property {string} binName name of the executable file
 * @property {string} alias shortcut for choice
 * @property {boolean} installed currently installed?
 * @property {boolean} recommended is recommended
 * @property {string} url homepage
 * @property {string} description description
 */

/** @type {CliOption[]} */
// 4.webpack可用的CLI:webpack-cli 和 webpack-command
const CLIs = [
	{
		name: "webpack-cli",
		package: "webpack-cli",
		binName: "webpack-cli",
		alias: "cli",
		installed: isInstalled("webpack-cli"),
		recommended: true,
		url: "https://github.com/webpack/webpack-cli",
        // 具备webpack所有特性(其一即可)
		description: "The original webpack full-featured CLI."
	},
	{
		name: "webpack-command",
		package: "webpack-command",
		binName: "webpack-command",
		alias: "command",
		installed: isInstalled("webpack-command"),
		recommended: false,
		url: "https://github.com/webpack-contrib/webpack-command",
        // 具备webpack部分特性(其一即可)
		description: "A lightweight, opinionated webpack CLI."
	}
];
// 5.判断是否两个CLI都安装了
const installedClis = CLIs.filter(cli => cli.installed);

// 6.根据安装的CLI数量进行处理:如果没有安装任何CLI,抛出notify,并引导安装CLI,执行`npm install webpack-cli -D` or `yarn add webpack-cli`
if (installedClis.length === 0) {
	const path = require("path");
	const fs = require("fs");
	const readLine = require("readline");

	let notify =
		"One CLI for webpack must be installed. These are recommended choices, delivered as separate packages:";

	for (const item of CLIs) {
		if (item.recommended) {
			notify += `\n - ${item.name} (${item.url})\n   ${item.description}`;
		}
	}

	console.error(notify);
    // 判断使用yarn还是npm
	const isYarn = fs.existsSync(path.resolve(process.cwd(), "yarn.lock"));

	const packageManager = isYarn ? "yarn" : "npm";
	const installOptions = [isYarn ? "add" : "install", "-D"];

	console.error(
		`We will use "${packageManager}" to install the CLI via "${packageManager} ${installOptions.join(
			" "
		)}".`
	);

	const question = `Do you want to install 'webpack-cli' (yes/no): `;

	const questionInterface = readLine.createInterface({
		input: process.stdin,
		output: process.stderr
	});
	questionInterface.question(question, answer => {
		questionInterface.close();
        // 判断选择命令y or n
		const normalizedAnswer = answer.toLowerCase().startsWith("y");

		if (!normalizedAnswer) {
			console.error(
				"You need to install 'webpack-cli' to use webpack via CLI.\n" +
					"You can also install the CLI manually."
			);
			process.exitCode = 1;

			return;
		}

		const packageName = "webpack-cli";

		console.log(
			`Installing '${packageName}' (running '${packageManager} ${installOptions.join(
				" "
			)} ${packageName}')...`
		);
        // 执行安装命令
		runCommand(packageManager, installOptions.concat(packageName))
			.then(() => {
				require(packageName); //eslint-disable-line
			})
			.catch(error => {
				console.error(error);
				process.exitCode = 1;
			});
	});
    // 如果只安装了一个CLI
} else if (installedClis.length === 1) {
	const path = require("path");
	const pkgPath = require.resolve(`${installedClis[0].package}/package.json`);
	// eslint-disable-next-line node/no-missing-require
	const pkg = require(pkgPath);
	// eslint-disable-next-line node/no-missing-require
	require(path.resolve(
		path.dirname(pkgPath),
		pkg.bin[installedClis[0].binName]
	));
} else {
     // 如果安装了两个CLI
	console.warn(
		`You have installed ${installedClis
			.map(item => item.name)
			.join(
				" and "
			)} together. To work with the "webpack" command you need only one CLI package, please remove one of them or use them directly via their binary.`
	);

	// @ts-ignore
    // 设置退出码,同时让进程正常退出
	process.exitCode = 1;
}
2
3
4
5
6
7
8
9
10
11
12
13
14
15
16
17
18
19
20
21
22
23
24
25
26
27
28
29
30
31
32
33
34
35
36
37
38
39
40
41
42
43
44
45
46
47
48
49
50
51
52
53
54
55
56
57
58
59
60
61
62
63
64
65
66
67
68
69
70
71
72
73
74
75
76
77
78
79
80
81
82
83
84
85
86
87
88
89
90
91
92
93
94
95
96
97
98
99
100
101
102
103
104
105
106
107
108
109
110
111
112
113
114
115
116
117
118
119
120
121
122
123
124
125
126
127
128
129
130
131
132
133
134
135
136
137
138
139
140
141
142
143
144
145
146
147
148
149
150
151
152
153
154
155
156
157
158
159
160
161
162
163
164
165
166
167
168
169
170
171
172
173
174
175
176
177
178
179
180
181
182
183
184
🌙 1.4 启动后的结果:
webpack最终找到webpack-cli(或webpack-command)这个npm包,并且执行CLI
🌙 2. webpack-cli 源码分析
🌙 2.1 webpack-cli做的事情
引入
yargs(opens new window)(Yargs是一个用于创建交互式命令行工具的npm包),对命令进行定制分析命令行参数,对各个参数进行转换,组成编译配置项
引入webpack,根据配置项进行编译和构建
🌙 2.2 分析webpack cli.js源码
webpack-cli处理不需要经过编译的命令:
从NON_COMPILATION_ARGS分析不需要编译的命令。
webpack cli.js源码:
const { NON_COMPILATION_ARGS } = require("./utils/constants");

(function() {
	// wrap in IIFE to be able to use return

	const importLocal = require("import-local");
	// Prefer the local installation of webpack-cli
	if (importLocal(__filename)) {
		return;
	}
    // 使用v8编译缓存
	require("v8-compile-cache");
    // 错误处理
	const ErrorHelpers = require("./utils/errorHelpers");

	const NON_COMPILATION_CMD = process.argv.find(arg => {
	if (arg === "serve") {
		global.process.argv = global.process.argv.filter(a => a !== "serve");
		process.argv = global.process.argv;
	}
		return NON_COMPILATION_ARGS.find(a => a === arg);
});

	if (NON_COMPILATION_CMD) {
        // 判断@webpack-cli是否安装,没有安装就给出安装提示及cmd命令
		return require("./utils/prompt-command")			         (NON_COMPILATION_CMD, ...process.argv);
}
    // 执行`./node_modules/.bin/webpack help `之后生成help帮助信息
	const yargs = require("yargs").usage(`webpack-cli 				  ${require("../package.json").version}
Usage: webpack-cli [options]
       webpack-cli [options] --entry <entry> --output <output>
       webpack-cli [options] <entries...> --output <output>
       webpack-cli <command> [options]
For more information, see https://webpack.js.org/api/cli/.`);
// 将help中的信息传递给config-yargs,实现执行其中的cmd命令
	require("./config/config-yargs")(yargs);
...

const webpack = require("webpack");
})
2
3
4
5
6
7
8
9
10
11
12
13
14
15
16
17
18
19
20
21
22
23
24
25
26
27
28
29
30
31
32
33
34
35
36
37
38
39
40
webpack-cli提供的不需要编译的命令:
const NON_COMPILATION_ARGS = [
    'init',··················创建一份webpack配置文件
    'migrate',···············进行webpack版本迁移
    'add',···················往webpack配置文件中增加属性
    'remove',················往webpack配置文件中删除属性
    'serve',·················运行webpack-serve
    'generate-loader',·······生成webpack loader代码
    'generate-plugin',·······生成webpack plugin代码
    'info'···················返回与本地环境相关的一些信息
]
2
3
4
5
6
7
8
9
10
🌙 2.3 webpack-cli使用args分析
参数分组(config/config-args.js),将命令划分为9类:
./utils/constants.js源码:
const CONFIG_GROUP = "Config options:";
const BASIC_GROUP = "Basic options:";
const MODULE_GROUP = "Module options:";
const OUTPUT_GROUP = "Output options:";
const ADVANCED_GROUP = "Advanced options:";
const RESOLVE_GROUP = "Resolving options:";
const OPTIMIZE_GROUP = "Optimizing options:";
const DISPLAY_GROUP = "Stats options:";
2
3
4
5
6
7
8
| options | 说明 |
|---|---|
Config options | 配置相关参数(文件名称、运行环境等) |
Basic options | 基础参数(entry设置、debug模式设置、watch监听设置、devtool设置) |
Module options | 模块参数,给load设置扩展 |
Output options | 输出参数(输出路径、输出文件名称) |
Advanced options | 高级用法(记录设置、缓存设置、监听频率、bail等) |
Resolving options | 解析参数(alias和解析的文件后缀设置) |
Optimizating options | 优化参数 |
| Stats options | 统计参数 |
options | 通用参数(帮助命令、版本信息等) |
🌙 2.4 webpack-cli执行结果
webpack-cli对配置文件和命令行参数进行转换最终生成配置文件选项参数options,最终会根据配置参数实例化webpack对象,然后执行构建流程。
🌙 3. 理解Webpack 编译原理——Tapable
🌙 3.1 为什么要了解Tabpable?
webapck本质:webpack可以将其理解是一种基于事件流的编程范例,一系列的插件运行。
若想理解webpack是怎么实现编译的,需要了解Compiler和Compilation,而Compiler和Compilation都继承自Tapable:
webpack.js:
const webpack = (options, callback) => {
	const webpackOptionsValidationErrors = validateSchema(
		webpackOptionsSchema,
		options
	);
	if (webpackOptionsValidationErrors.length) {
		throw new WebpackOptionsValidationError(webpackOptionsValidationErrors);
	}
	let compiler;
	if (Array.isArray(options)) {
		compiler = new MultiCompiler(
			Array.from(options).map(options => webpack(options))
		);
	} else if (typeof options === "object") {
		options = new WebpackOptionsDefaulter().process(options);

		compiler = new Compiler(options.context);

        ....
2
3
4
5
6
7
8
9
10
11
12
13
14
15
16
17
18
19
Compier.js: 继承自Tapable
class Compiler extends Tapable {
	constructor(context) {
		super();
		this.hooks = {
			/** @type {SyncBailHook<Compilation>} */
			shouldEmit: new SyncBailHook(["compilation"]),
			/** @type {AsyncSeriesHook<Stats>} */
			done: new AsyncSeriesHook(["stats"]),
			/** @type {AsyncSeriesHook<>} */
			additionalPass: new AsyncSeriesHook([]),
			/** @type {AsyncSeriesHook<Compiler>} */
			beforeRun: new AsyncSeriesHook(["compiler"]),
			/** @type {AsyncSeriesHook<Compiler>} */
			run: new AsyncSeriesHook(["compiler"]),
			/** @type {AsyncSeriesHook<Compilation>} */
			emit: new AsyncSeriesHook(["compilation"]),
			/** @type {AsyncSeriesHook<string, Buffer>} */
			assetEmitted: new AsyncSeriesHook(["file", "content"]),
			/** @type {AsyncSeriesHook<Compilation>} */
			afterEmit: new AsyncSeriesHook(["compilation"]),

			/** @type {SyncHook<Compilation, CompilationParams>} */
			thisCompilation: new SyncHook(["compilation", "params"]),
			/** @type {SyncHook<Compilation, CompilationParams>} */
			compilation: new SyncHook(["compilation", "params"]),
			/** @type {SyncHook<NormalModuleFactory>} */
			normalModuleFactory: new SyncHook(["normalModuleFactory"]),
			/** @type {SyncHook<ContextModuleFactory>}  */
			contextModuleFactory: new SyncHook(["contextModulefactory"]),

			/** @type {AsyncSeriesHook<CompilationParams>} */
			beforeCompile: new AsyncSeriesHook(["params"]),
			/** @type {SyncHook<CompilationParams>} */
			compile: new SyncHook(["params"]),
			/** @type {AsyncParallelHook<Compilation>} */
			make: new AsyncParallelHook(["compilation"]),
			/** @type {AsyncSeriesHook<Compilation>} */
			afterCompile: new AsyncSeriesHook(["compilation"]),

			/** @type {AsyncSeriesHook<Compiler>} */
			watchRun: new AsyncSeriesHook(["compiler"]),
			/** @type {SyncHook<Error>} */
			failed: new SyncHook(["error"]),
			/** @type {SyncHook<string, string>} */
			invalid: new SyncHook(["filename", "changeTime"]),
			/** @type {SyncHook} */
			watchClose: new SyncHook([]),

			/** @type {SyncBailHook<string, string, any[]>} */
			infrastructureLog: new SyncBailHook(["origin", "type", "args"]),

			// TODO the following hooks are weirdly located here
			// TODO move them for webpack 5
			/** @type {SyncHook} */
			environment: new SyncHook([]),
			/** @type {SyncHook} */
			afterEnvironment: new SyncHook([]),
			/** @type {SyncHook<Compiler>} */
			afterPlugins: new SyncHook(["compiler"]),
			/** @type {SyncHook<Compiler>} */
			afterResolvers: new SyncHook(["compiler"]),
			/** @type {SyncBailHook<string, Entry>} */
			entryOption: new SyncBailHook(["context", "entry"])
		};
        ...
2
3
4
5
6
7
8
9
10
11
12
13
14
15
16
17
18
19
20
21
22
23
24
25
26
27
28
29
30
31
32
33
34
35
36
37
38
39
40
41
42
43
44
45
46
47
48
49
50
51
52
53
54
55
56
57
58
59
60
61
62
63
64
65
Compilation.js:继承自Tapable
class Compilation extends Tapable {
	...
}
2
3
🌙 3.2 Tapable是什么?
Tapable是一个类似与NodeJS的EventEmitter的库,主要是控制钩子函数的发布与订阅,控制着webpack的插件系统。
从源码可以看出,Tapable库暴露了很多Hook(钩子),为插件提供挂载时机:
const {
	SyncHook,                            // 同步钩子
	SyncBailHook,                        // 同步熔断钩子
	SyncWaterfallHook,				    // 同步流水钩子
    SyncLoopHook,						// 同步循环钩子
    AsyncParallelHook,					// 异步并发钩子
    AsyncParallelBailHook,				// 异步并发熔断钩子
	AsyncSeriesHook,					// 异步串行钩子
    AsyncSeriesBailHook,				// 异步串行熔断钩子
    AsyncSeriesWaterfallHook			// 异步串行流水钩子
} = require("tapable");
2
3
4
5
6
7
8
9
10
11
🌙 3.3 Tapable hooks类型
| type | function |
|---|---|
| Hook | 所有钩子的后缀 |
| Waterfall | 同步方法,但是他会传值给下一个函数 |
| Bail | 熔断,当函数有任何返回值,就会在当前执行函数停止 |
| Loop | 监听函数返回true表示继续循环,返回undefined表示结束循环 |
| Sync | 同步方法 |
| AsyncSeries | 异步串行钩子 |
| AsyncParallel | 异步并行执行钩子 |
🌙 3.4 Tapable的使用——new Hook新建钩子
Tapable暴露出来的都是类方法,new 一个雷方法获得我们需要的钩子函数。构造函数接受数组参数options,非必须,类会根据参数接受同样数量的参数。
const hook = new SyncHook(['arg1', 'arg2', 'arg3']);
Tapable实现发布订阅:
Tapable提供了同步&异步绑定钩子的方法,并且他们都有绑定事件和执行事件对应的方法。
| Async* 异步 | Sync*同步 |
|---|---|
绑定:tapAsync、tapPromise、tap | tap |
callAsync、promise | call |
demoe1:
const { SyncHook } = require("tapable");

cosnt hook = new SyncHook(['arg1', 'arg2','arg3']);
// 绑定事件到webpack事件流
hook.tap('hook', (arg1,arg2,arg3) => console.log(arg1,arg2,arg3));

// 执行绑定的事件
hook.call(1,2,3);
2
3
4
5
6
7
8
demo2:
const { SyncHook, AsyncSeriesHook } = require("tapable");

class Car {
    constructor() {
        this.hooks = {
            accelerate: new SyncHook(['newSpeed']),
            brake: new SyncHook(),
            calculateRoutes: new AsyncSeriesHook(['source', 'target', 'routesList'])
        }
    }
}

const car = new Car();
// 绑定同步钩子
car.hooks.brake.tap('WarningLampPlugin', () => console.log('WarningLampPlugin'));
// 绑定同步钩子,并传参
car.hooks.accelerate.tap('LoggerPlugin', newSpeed => console.log(`Accelerate to ${newSpeed}`));
// 绑定一个异步promise钩子
car.hooks.calculateRoutes.tapPromise('calculateRoutes tapPromise', (source, target, routesList) => {
    console.log('source', source);

    return new Promise((resolve, reject) => {
        setTimeout(() => {
            console.log(`tapPromise to ${source} ${target} ${routesList}`);
            resolve();
        }, 1000)
    })
});

// 执行
car.hooks.brake.call();
car.hooks.accelerate.call(100);
console.time('promise');
car.hooks.calculateRoutes.promise('Async', 'hook','demo').then(() => {
	console.timeEnd('promise');
}, err => {
    console.error(err);
    console.timeEnd('promise');
});
2
3
4
5
6
7
8
9
10
11
12
13
14
15
16
17
18
19
20
21
22
23
24
25
26
27
28
29
30
31
32
33
34
35
36
37
38
39
🌙 3.5 Tapable怎么与webpack联系起来的?
webpack.js:
if (Array.isArray(options)) {
		compiler = new MultiCompiler(
			Array.from(options).map(options => webpack(options))
		);
	} else if (typeof options === "object") {
		options = new WebpackOptionsDefaulter().process(options);
        // Compiler继承自Tapable
		compiler = new Compiler(options.context);
		compiler.options = options;
        // 插件必须有apply方法接受compiler对象
		new NodeEnvironmentPlugin({
			infrastructureLogging: options.infrastructureLogging
		}).apply(compiler);
        // webpack外部插件
		if (options.plugins && Array.isArray(options.plugins)) {
			for (const plugin of options.plugins) {
				if (typeof plugin === "function") {
					plugin.call(compiler, compiler);
				} else {
					plugin.apply(compiler);
				}
			}
		}
		compiler.hooks.environment.call();
		compiler.hooks.afterEnvironment.call();
        // webpack内部插件
		compiler.options = new WebpackOptionsApply().process(options, compiler);
    }
... ... ...
2
3
4
5
6
7
8
9
10
11
12
13
14
15
16
17
18
19
20
21
22
23
24
25
26
27
28
29
插件必须有apply方法接受compiler对象,apply方法实现tapable的事件监听。
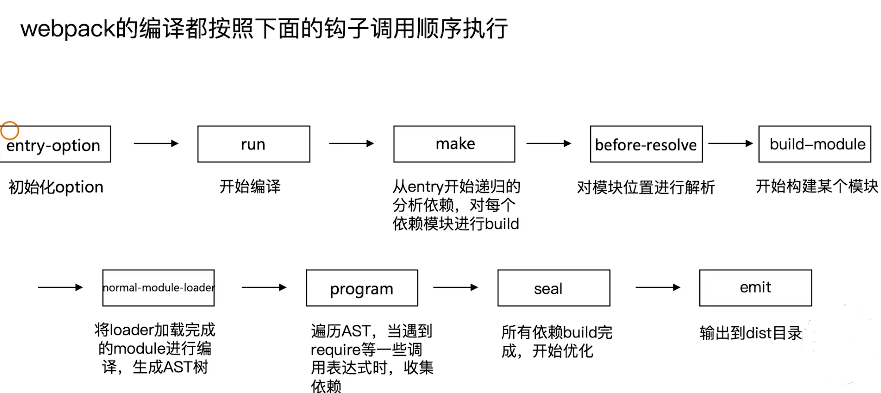
🌙 4. webapck编译流程
🌙 5.实现简易webpack
目标:
可以将ES6语法转换为ES5语法
- 通过
babylon生成AST - 通过
babel-core将AST重新生成源码
- 通过
可以分析模块之间的依赖关系
- 通过
babel-traverse的importDeclaration方法获取依赖属性
- 通过
生成的JS可以在浏览器中运行
🌙 5.1 模块化:增强代码可读性和维护性
ES module 静态导入
import * as largeNumber from 'large-number';
largeNumber.add('999999999999999', '1');
1
2CJS 动态导入
const largeNumber = require('large-number');
largeNumber.add('999999999999999', '1');
1
2AMD 借鉴CJS
require(['large-number'], function(large-number) {
    // ...
    largeNumber.add('999999999999999', '1');
})
1
2
3
4
🌙 5.2 AST(抽象语法树 )基础
抽象语法树(AST: abstract syntax tree)是源代码的抽象语法结构的树状表现形式,树上的每个节点都表示源代码中的一种结构。
🌙 5.3 编写simplepack
parse.js:
const fs = require('fs');
const babylon = require('babylon');
const traverse = require('babel-traverse').default;
const { transformFromAst } = require('babel-core');

module.exports = {
    getAST: (path) => {
        // 读取源码文件
        const content = fs.readFileSync(path, 'utf-8')

       // 将源码转为AST
        return babylon.parse(content, {
            sourceType: 'module',
        });
    },
    // 获取依赖
    getDependencis: (ast) => {
        const dependencies = []
        traverse(ast, {
          ImportDeclaration: ({ node }) => {
            dependencies.push(node.source.value);
          }
        });
        return dependencies;
    },
    // 将AST还原为ES5代码
    transform: (ast) => {
        const { code } = transformFromAst(ast, null, {
            presets: ['env']
        });

        return code;
    }
};
2
3
4
5
6
7
8
9
10
11
12
13
14
15
16
17
18
19
20
21
22
23
24
25
26
27
28
29
30
31
32
33
34
compiler.js:
const fs = require('fs');
const path = require('path');
const { getAST, getDependencis, transform } = require('./parser');


module.exports = class Compiler {
    constructor(options) {
        const { entry, output } = options;
        this.entry = entry;
        this.output = output;
        this.modules = [];
    }
    // 构建入口
    run() {
        const entryModule = this.buildModule(this.entry, true);
        this.modules.push(entryModule);
        this.modules.map((_module) => {
            _module.dependencies.map((dependency) => {
                this.modules.push(this.buildModule(dependency));
            });
        });
        this.emitFiles();
    }

    buildModule(filename, isEntry) {
        let ast;
        if (isEntry) {
            ast = getAST(filename);
        } else {
            let absolutePath = path.join(process.cwd(), './src', filename);
            ast = getAST(absolutePath);
        }

        return {
          filename,
          dependencies: getDependencis(ast),
          transformCode: transform(ast)
        };
    }

    // 生成bundle.js
    emitFiles() {
        const outputPath = path.join(this.output.path, this.output.filename);
        let modules = '';
        this.modules.map((_module) => {
            modules += `'${ _module.filename }': function (require, module, exports) { ${ _module.transformCode } },`
        });
        // IIFE包裹
        const bundle = `
            (function(modules) {
                function require(fileName) {
                    const fn = modules[fileName];

                    const module = { exports : {} };

                    fn(require, module, module.exports);

                    return module.exports;
                }
                require('${this.entry}');
            })({${modules}})
        `;

        // 写入文件
        fs.writeFileSync(outputPath, bundle, 'utf-8');
    }
};
2
3
4
5
6
7
8
9
10
11
12
13
14
15
16
17
18
19
20
21
22
23
24
25
26
27
28
29
30
31
32
33
34
35
36
37
38
39
40
41
42
43
44
45
46
47
48
49
50
51
52
53
54
55
56
57
58
59
60
61
62
63
64
65
66
67
🌙 6.编写loader
🌙 6.1 最简单的loader
定义:loader只是一个导出为函数的JavaScript模块。
// 定义一个 loaders/a-loader.js
module.exports = function(source) {
    console.log('a-loader is executed')
    return source;
};

// 在webpack.config.js中配置
module.exports = {
    ...
    module: {
        rules: [
            // 使用a-loader
            {
                test: /\.js$/,
                use: [
                    path.resolve('./loaders/a-loader')
                ]
            }
        ]
    }
    ...
}
2
3
4
5
6
7
8
9
10
11
12
13
14
15
16
17
18
19
20
21
22
🌙 6.2 多loader执行顺序
多个
loader串行执行对个
loader执行顺序从后往前:less-loader ---> css-loader ---> style-loader1
module.exports = {
    entry: './src/index.js',
    output: {
        filename: 'bundle.js',
        path: path.resolve(__dirname, 'dist')
    },
    module: {
        rules: [
            {
                test: /\.less$/,
                use: [
                    'style-loader',
                    'css-loader',
                    'less-loader'
                ]
            }
        ]
    }
}
2
3
4
5
6
7
8
9
10
11
12
13
14
15
16
17
18
19
为什么loader是从后往前执行呢?—— 函数组合(高阶函数)compose
// 先执行g函数,再执行f函数
compose = (f, g) => (...args) => f(g(...args))
2
🌙 6.3 使用loader-runner调试loader
定义: loader-runner (opens new window)允许你在不安装webpack的情况下运行loaders
作用:
- 作为webpack的依赖,webpack中使用它执行loader
- 进行loader的开发和调试
使用:
import { runLoaders } from 'loader-runner';

/**
* @param options: object
* 				resource: string 资源的绝对路径(可以增加查询字符串)
* 				loaders: string[] loader的绝对路径(可以增加查询字符串)
*				context: 基础上下文之外的额外loader上下文
* 				readResource: 读取资源的函数
* @param callback: function(err,data) 回调函数(err: Error? data.result: Buffer | String)
*/
runLoaders({
    resource: '/abs/path/to/file.txt?query',
    loaders: ['/abs/path/to/loader.js?query'],
    context: { minimize: true },
    readResource: fs.readFile.bind(fs)
}, function(err, data) {

})
2
3
4
5
6
7
8
9
10
11
12
13
14
15
16
17
18
🌙 6.4 开发一个raw-loader
功能:将文件转为字符串
src/raw-loader.js
// 同步loader
module.exports = function(source) {
    const json = JSON.stringfy(source)
    			.replace(/\u2028/g, '\\u2028') // 为了安全起见,ES6模板字符串的问题
    			.replace(/\u2029/g, '\\u2029');
    // 异常处理:
    // 1.直接 throw new Error('Error')
    return `export default ${json}`
    // return也可以替换为this.callback 处理异常
    // 2.this.callback(err, json,2,3)
}
2
3
4
5
6
7
8
9
10
11
🌙 6.5 使用loader-runner调试raw-loader
node run-loader.js
run-loader.js:
const fs = require('fs');
const path = require('path');
const { runLoaders } = require('loader-runner');

runLoaders(
    {
        resource: './demo.txt',
    	loaders: [path.resolve(__dirname, './loaders/raw-loader')],
    	readResource: fs.readFile.bind(fs)
    },
    (err, data) => (err ? conseole.error(err) : console.log(data))
)
2
3
4
5
6
7
8
9
10
11
12
13
🌙 6.6 loader异步处理
通过this.async(err, data)来返回一个异步函数(比如需要文件的读写,需要异步处理)
const path = require('path');
const fs = require('fs');
// 异步loader
module.exports = function() {
    const callback = this.async();
    // 关闭缓存
    // this.cacheable(false);
    fs.readFile(path.join(__dirname, './async.txt'), 'utf-8', (err, data) => {
         if(err) {
             callback(err, '')
         } else {
              callback(null, data
         }
    })
}
2
3
4
5
6
7
8
9
10
11
12
13
14
15
🌙 6.7 loader如何进行文件输出
通过this.emitFile进行文件写入:
const loaderUtils = require('loader-utils');

module.exports = function(content) {
    const url = loaderUtils.interpolateName(this, '[hash].[ext]', {content});
    this.emitFile(url, content);
    // __webpack_public_path__  全局变量
    const path = `__webpack_public_path__ + ${JSON.stringfy(url)}`;

    return `export default ${path};`;
}
2
3
4
5
6
7
8
9
10
🌙 6.8 实现自动合成雪碧图的loader
- 支持的语法:
background: url('a.png?__sprite');
background: url('b.png?__sprite');

# 两者结合,合成一张图片
background: url('sprite.png')
2
3
4
5
- 代码实现前提
使用 spritesmith (opens new window),示例:
const Spritesmith = require('spritesmith');
const fs = require('fs');
const path = require('path');
const sprites = ['./images/1.png', './images/2.png'];

Spritesmith.run({src: sprites}, function handleResult (err, result) {
    console.log(result.image);
    console.log(result.coordinates);
    console.log(result.properties);

    fs.writeFileSync(path.join(__dirname, 'dist/sprite.jpg'), result.image)
});
2
3
4
5
6
7
8
9
10
11
12
3.实现sprite-loader.js
const Spritesmith = require('spritesmith');
const fs = require('fs');
const path = require('path');

module.exports = function(source) {
    const callback = this.async();
    const imgs = source.match(/url\((\S*))\?__sprite/g);
    const matchedImgs = [];

    for(let i = 0; i< imgs.length; i++) {
        const img = imgs[i].match(/url\((\S*))\?__sprite/)[1];
        matchedImgs.push(path.join(__dirname, img));
    }

    Spritesmith.run({src: matchedImgs}, (err, result) => {
    	fs.writeFileSync(path.join(process.cwd(), 'dist/sprite.jpg'), result.image);
        source = source.replace(/url\((\S*))\?__sprite/g, (match) => {
            return `url("dist/sprite.jpg")`;
        });

        callback(null, source);
	});
};
2
3
4
5
6
7
8
9
10
11
12
13
14
15
16
17
18
19
20
21
22
23
24
🌙 7. 编写plugin
🌙 7.1 插件的运行环境
- 插件没有像loader那样的独立运行环境
- 只能在webpack里面运行
🌙 7.2 插件的基本结构
// 1.插件名称
class MyPlugin {
	// 2.插件上apply方法
    apply(compiler) {
		// 3.插件的hooks
        compiler.hooks.done.tap('My Plugin',( stats) => {
  		// 4.插件处理逻辑
           console.log('Hello Plugin')
        })
    }
}

module.exports = MyPlugin
2
3
4
5
6
7
8
9
10
11
12
13
插件的使用:(在webpack.config.js中)
plugins: [new MyPlugin()]
🌙 7.3 开发一个最简单的插件
src/deme-plugin.js:
module.exports = class DemoPlugin {
    // 插件传参
    constructor(options) {
        this.options = options;
    }

    apply(compiler) {
        console.log('apply', this.options);
    }
};
2
3
4
5
6
7
8
9
10
将插件加入到webpack配置中:
module.exports = {
    ...
     // 插件传参
    plugins: [new DemoPlugin({name: 'demo'})]
    ...
};
2
3
4
5
6
🌙 7.4 插件的错误处理
参数校验阶段可以直接
throw的方式抛出throw new Error('Error Message')1通过compilation对象的warnings和errors接收
compilation.warnings.push('warning');
compilation.errors.push('error');
1
2
🌙 7.5 通过Compilation进行文件写入
Compilation上的assets可以用于文件写入:
- 可以将zip资源包设置到
compilation.assets对象上
文件写入需要使用webpack-sources (opens new window)
const {RawSource} = require('webpack-sources');

module.exports = class DemoPlugin{
    constructor(options) {
        this.options = options;
    }
    apply(compiler) {
        const {name} = this.options;
        compiler.plugin('emit', (compilation, cb) => {
            compilation.assets[name] = new RawSource('demo');
            cb();
        })
    }
}
2
3
4
5
6
7
8
9
10
11
12
13
14
🌙 7.6 插件的扩展:为插件编写插件
插件自身也可以通过暴露hooks的方式进行自身扩展,以html-webpack-plugin为例:
html-webpack-plugin-alter-chunks(Sync)html-webpack-plugin-before-html-generation(Async)html-webpack-plugin-alter-asset-tags(Async)html-webpack-plugin-after-html-processing(Async)html-webpack-plugin-after-emit(Async)
🌙 7.7 编写压缩构建资源为zip的插件
要求:
- 生成的
zip包文件名称可以通过插件传入 - 需要使用
compiler对象上的hooks进行资源生成
使用jszip (opens new window)来实现:
zip-plugin:
const JSZip = require('jszip');
const path = require('path');
const RawSource = require('webpack-sources').RawSource;
const zip = new JSZip();

module.exports = class ZipPlugin {
    constructor(options) {
        this.options = options;
    }

    apply(compiler) {
        compiler.hooks.emit.tapAsync('ZipPlugin', (compilation, callback) => {
            // 文件目录
            const folder = zip.folder(this.options.filename);

            for (let filename in compilation.assets) {
                // 获取source
                const source = compilation.assets[filename].source();
                folder.file(filename, source);
            }

            // 生成zip文件
            zip.generateAsync({
                // 设置文件格式为buffer
                type: 'nodebuffer'
            }).then((content) => {
                  // 输出文件的具体目录
                const outputPath = path.join(
                    compilation.options.output.path,
                    this.options.filename + '.zip'
                );
                // 将绝对路径转为相对路径
                const outputRelativePath = path.relative(
                    compilation.options.output.path,
                    outputPath
                );
                // 负责文件的生成
                compilation.assets[outputRelativePath] = new RawSource(content);

                callback();
            });
        });
    }
}
2
3
4
5
6
7
8
9
10
11
12
13
14
15
16
17
18
19
20
21
22
23
24
25
26
27
28
29
30
31
32
33
34
35
36
37
38
39
40
41
42
43
44