🌙 Webpack学习笔记之高级应用
🌙 1. 自动清理构件目录
每次构建的时候不会自用清理目录,会造成构件的输出目录output文件越来越多。需要每次执行rm -rf ./dist来手动清理。
使用clean-webpack-plugin实现自动清理之前的构建文件:
const path = require('path');
// 默认删除output指定的输出目录
const CleanWebpackPlugin = require('clean-webpack-plugin');

module.exports = {
    entry: './src/app.js',
    output: {
        filenma: '[name]_[chunkhash:8].js',
        path: path.join(__dirname, 'dist'),
    },
    plugins: [
        new CleanWebpackPlugin()
    ]
}
2
3
4
5
6
7
8
9
10
11
12
13
14
安装yarn add clean-webpack-plugin -D
🌙 2.PostCSS插件autoprfixer自动补齐CSS3前缀
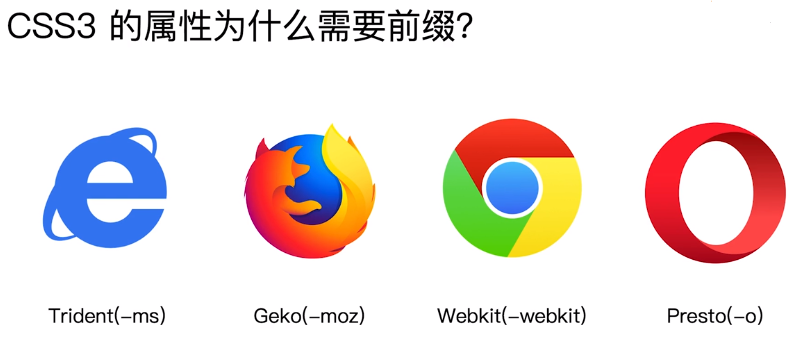
为了兼容各种浏览器,需要手动添加css前缀,例子:
.box {
    -moz-border-radius: 10px;
    -webkit-border-radius: 10px;
    border-radius: 10px;
}
2
3
4
5
实现自动添加css前缀:
使用autoprefixer插件,它根据Can I Use (opens new window)规则来实现自动补全css前缀。需要结合postcss-loader
module.exports = {
    module: {
        rules: [
            {
                test:/.\less$/,
                use: [
                    'style-loader',
                    'css-loader',
                    'less-loader',
                    {
                        loader: 'postcss-loader',
                        options: {
                            pluguins:() => [
                                require('autoprefixer')({
                                    // 指定兼容的浏览器最低版本
                                    browsers:['last 2 version', '>1%', 'ios 7']
                                })
                            ]
                        }
                    }
                ]
            }
        ]
    }
}
2
3
4
5
6
7
8
9
10
11
12
13
14
15
16
17
18
19
20
21
22
23
24
25
安装依赖:
yarn add postcss-loader autoprefixed -D
🌙 3.CSS单位PX自动转为rem
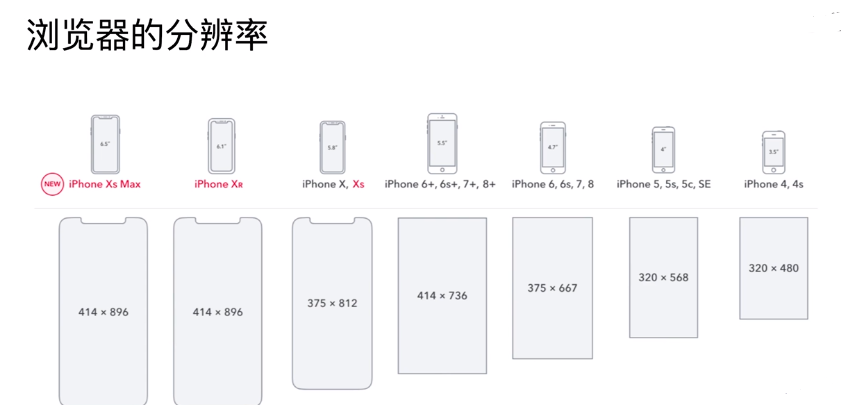 移动端设备分辨率五花八门,为了适应移动端设备,
CSS3引入了rem单位(相对于root的font-size大小),配合媒体查询(@media)来实现移动端适配。
@media (min-width: 240px) {
    html {
        font-size: 32px;
    }
}
@media (min-width: 320px) {
    html {
        font-size: 42.66667px;
    }
}
@media (min-width: 360px) {
    html {
        font-size: 48px;
    }
}
@media (min-width: 375px) {
    html {
        font-size: 50px;
    }
}
@media (min-width: 384px) {
    html {
        font-size: 51.2px;
    }
}
2
3
4
5
6
7
8
9
10
11
12
13
14
15
16
17
18
19
20
21
22
23
24
25
通过这种方案,然后计算出某一个分辨率下的rem单位完成适配。但是计算rem也会耗时。
借助px2rem-loader实现自动转换为rem单位:
module.exports = {
    module: {
        rules: [
            {
                test:/.\less$/,
                use: [
                    'style-loader',
                    'css-loader',
                    'less-loader',
                    {
                        loader: 'px2rem-loader',
                        options: {
                            // 1rem = 75px
                            remUnit: 75,
                            // rem小数点位数
                            remPrecision: 8
                        }
                    }
                ]
            }
        ]
    }
}
2
3
4
5
6
7
8
9
10
11
12
13
14
15
16
17
18
19
20
21
22
23
页面渲染时计算根元素的font-size的值(自动转换px到rem)。然后借助lib-flexible库 (opens new window),自动完成其他分辨率下的适配(@media的工作)。
在 index.html页面下添加:
<meta name="viewport" content="width=device-width, initial-scale=1, maximum-scale=1, minimum-scale=1, user-scalable=no">
<script src="./node_modules/amfe-flexible/index.js"></script>
2
安装依赖:
# px ---> rem
yarn add px2rem-loader -D
# @media实现媒体查询
yarn add amfe-flexible -D
2
3
4
🌙 4.内联css、js等资源
🌙 4.1 内联的意义
- 代码层面:
- 页面框架的初始化脚本
- 上报相关打点
- css内联避免页面闪动
- 请求层面:减少HTTP网络请求
- 小图片或者字体内联(
url-loader)
- 小图片或者字体内联(
🌙 4.2 HTML和JS的内联
安装依赖yarn add raw-loader --D
raw-loader内联HTML:// 使用html-webpack-plugin默认引擎是ejs <script>${require('raw-loader!babel-loader!./meta.html')}</script>1
2raw-loader内联JS:<script>${require('raw-loader!babel-loader!../node_modules/lib-flexible/flexible.js')}</script>1
🌙 4.3 CSS的内联
1.借助
style-loader:module.exports = { module: { rules: [ { test: /\.scss$/, use: [ { loader: 'style-loader', options: { // 将样式插入到<head>中 insertAt: 'top', // 将所有的style标签合并成一个 singleton: true } }, 'css-loader', 'sass-loader' ], }, ], }, },1
2
3
4
5
6
7
8
9
10
11
12
13
14
15
16
17
18
19
20
21
222.借助
html-inline-css-webpack-plugin(opens new window)安装依赖
yarn add html-inline-css-webpack-plugin -Dconst MiniCssExtractPlugin = require("mini-css-extract-plugin"); const HtmlWebpackPlugin = require('html-webpack-plugin'); const HTMLInlineCSSWebpackPlugin = require("html-inline-css-webpack-plugin").default; module.exports = { plugins: [ new MiniCssExtractPlugin({ filename: "[name].css", chunkFilename: "[id].css" }), new HtmlWebpackPlugin(), new HTMLInlineCSSWebpackPlugin(), ], module: { rules: [ { test: /\.css$/, use: [ MiniCssExtractPlugin.loader, "css-loader" ] } ] } }1
2
3
4
5
6
7
8
9
10
11
12
13
14
15
16
17
18
19
20
21
22
23
24
25
🌙 5. 多页面(MPA)打包
多页面(MPA:multi page application):每次页面跳转的时候,后台服务器都会返回一个新的html文档,这种页面就是多页面应用。(解耦业务、SEO友好)
多页面打包,之前是每个页面对应一个entry和一个html-webpack-plugin,缺点是每次新增或删除页面需要改webpack配置。
可以通过动态获取entry和设置html-webpack-plugin数量,来实现多页面自动打包配置:
利用glob.sync (opens new window),约定每个目录下的入口文件为index.js:
entry: glob.sync(path.join(__dirname, './src/*/index.js'))
const glob = require('glob')

const setMPA = () => {
    const entry  = {}
    const htmlWebpackPlugins= []

    // 获取entry入口文件
    const entryFiles = glob.sync(path.join(__dirname,'./src/*/index.js'))
    console.log(entryFiles)

    Object.keys(entryFiles).map(
        (index) => {
            const entryFile = entryFiles[index]
            const match = entryFile.match(/src\/(.*)\/index\.js/)
            const pageName = match && match[1]

            entry[pageName] = entryFile
            htmlWebpackPlugins.push(
                new HtmlWebpackPlugin({
                    template: path.join(__dirname, `src/${pageName}/index.html`),
                    filename: `${pageName}.html`,
                    chunks: [pageName],
                    inject: true,
                    minify: {
                        html5: true,
                        collapsableWhitespace: true,
                        preserveLineBreaks: false,
                        minifyJS: true,
                        minifyCSS: true,
                        removeComments: true
                    }
                })
            )
        }
    )

    return {
        entry,
        htmlWebpackPlugins
    }
}
const { entry, htmlWebpackPlugins } = setMPA()

module.exports = {
    entry: entry,
    plugins: [
        htmlWebpackPlugins
    ]
}
2
3
4
5
6
7
8
9
10
11
12
13
14
15
16
17
18
19
20
21
22
23
24
25
26
27
28
29
30
31
32
33
34
35
36
37
38
39
40
41
42
43
44
45
46
47
48
49
🌙 6.开启sourcemap
作用:通过
soucemap定位源代码,提高调试效率应用:开发环境开启,生产环境关闭(避免源代码泄漏)。线上排查问题的时候可以将
sourcemap上传到错误监控系统或者借助fundebug。启动
sourcemap配置// webpack.dev.js开发环境开启source-map module.exports = { devtool: 'source-map' }1
2
3
4source map 类型
devtool (opens new window) 首次构建 二次构建 是否适合生产环境 可以定位的代码 (none)非常快速 非常快速 yes 打包后的代码 eval非常快速 非常快速 no webpack生产的一个个模块代码cheap-source-map比较快 中等 no 经过loader转换过的代码(仅限行) source-map慢 慢 no 原始源代码
🌙 7.提取公共资源
🌙 7.1 基础库的分离
目的:将
react、react-dom基础包通过cdn引入,不打入bundle中。思路:使用
html-webpack-externals-plugin例如:不打包
react和react-dom而是替换为cdn(插入到<head>中)。const HtmlWebpackExternalsPlugin = require('html-webpack-externals-plugin'); module.exports = { ... plugins: [ new HtmlWebpackExternalsPlugin({ externals: [ { module: 'react', entry: 'https://unpkg.com/react@16/umd/react.production.min.js', global: 'React' }, { module: 'react-dom', entry: 'https://unpkg.com/react-dom@16/umd/react-dom.production.min.js', global: 'ReactDom' } ] }) ] ... }1
2
3
4
5
6
7
8
9
10
11
12
13
14
15
16
17
18
19
20
21
22
🌙 7.2 公共脚本的分离
利用
SplitChunksPlugin(opens new window):这个是webpack4内置的插件,替换CommonsChunkPlugin插件(废弃)。chunks参数说明:async:对异步引入的库进行分离(默认)initial:对同步引入的库进行分离all:对所有的引入的库进行分离(推荐)
所有参数如下:
module.exports = {
    optimization: {
        splitChunks: {
            // 异步
            chunks: 'async',
            minSize: 30000,
            minChunks: 1,
            maxAsyncRequsets: 5,
            maxInitialRequsets: 3,
            automaticNameDelimiter: '~',
            name: true,
            cacheGroups: {
                vendors: {
                    test: /[\\/]node_modules[\\/]/,
                    priority: -10
                }
            },
            default: {
            	minChunks: 2,
            	priority: -20,
            	reuseExistingChunk: true
    		}
        }
    }
}
1
2
3
4
5
6
7
8
9
10
11
12
13
14
15
16
17
18
19
20
21
22
23
24
25利用
SplitChunksPlugin分离基础包:比如分离react和react-dom,打包为vendors文件module.exports = { optimization: { splitChunks: { cacheGroups: { commons: { // 匹配react和react-dom test: /(react|react-dom)/, // 单独打包后的文件名 name: 'vendors', chunks: 'all' } }, } } }1
2
3
4
5
6
7
8
9
10
11
12
13
14
15利用
SplitChunksPlugin分离公共文件:module.exports = { optimization: { splitChunks: { // 分离包体积的最小值 minSize: 0 cacheGroups: { commons: { // 匹配react和react-dom test: /(react|react-dom)/, // 单独打包后的文件名 name: 'vendors', chunks: 'all', // 公共文件引入最小次数 minChunks: 2 } }, } } }1
2
3
4
5
6
7
8
9
10
11
12
13
14
15
16
17
18
19
🌙 7.3 进一步分包:预编译资源模块
思路: 将
react、react-dom、redux、react-redux基础包和业务包打包成一个文件方法:使用
DLLPlugin进行分包,DLLReferencePlugin对manifest.json引用webpack.dll.js:const path = require('path'); const webpack = require('webpack'); module.exports = { resolve: { extensions: ['.js', '.jsx', '.json', '.less', '.css'], modules: [__dirname, 'node_modules'] }, entry: { // 基础包 library: [ 'react', 'react-dom', 'redux', 'react-redux' ], // 业务包 vendor: [ './xx/index.js' ] }, output: { filename: '[name].dll.js', path: path.resolve(__dirname, './build/library'), library: '[name]_[fullhash]' }, plugins: [ new webpack.DLLPlugin({ context: __dirname, name: '[name]_[fullhash]', path: './build/library/[name].json' }), ] }1
2
3
4
5
6
7
8
9
10
11
12
13
14
15
16
17
18
19
20
21
22
23
24
25
26
27
28
29
30
31
32
33
34使用DLLReferencePlgin引用manifest.json,在webpack.prod.js中引入:
module.exports = {
    plugins: [
        new webpack.DLLPlugin({
            manifest: require('./build/library/library.json')
        })
    ]
}
1
2
3
4
5
6
7引入效果:
....
</div>
<script scr="/build/library/library.dll.js"></script>
···
1
2
3
4
🌙 8.Tree Shaking使用与原理 (opens new window)
理解: 你可以将应用程序想象成一棵树。绿色表示实际用到的 source code(源码) 和 library(库),是树上活的树叶。灰色表示未引用代码,是秋天树上枯萎的树叶。为了除去死去的树叶,你必须摇动这棵树,使它们落下。
你的Tree-Shaking并没什么卵用 (opens new window)
🌙 8.1 Tree Shaking使用
- 问题:1个模块中可能有多个方法,只要其中的某个方法被使用了,则整个文件都会被打包到
bundle文件里面去 - 解决:
tree shaking就是只把用到的方法打包到bundle,没用到的方法会在uglify阶段剔除。 - 使用:
webpack默认支持tree shaking,在.bablerc里面设置moduls:false即可**(mode:production下默认支持tree shaking)** - 前提:必须是
ES6的语法,commonjs不支持。
🌙 8.2 Tree Shaking原理
DEC (opens new window): 即
DEC(Dead Code Elimination),剔除无效代码- 代码不会被执行,不可到达
- 代码执行的结果不会被用到
- 代码只会影响死变量(只写不读)
webpack tree-shaking(opens new window)原理——利用ES6模块的特点(在uglify阶段删除无用代码):- 只能作为模块顶层的语句出现
import的模块名只能是字符串常量import binding是immutable的
剔除无用的
CSS:1.
PurgecssPlugin(opens new window): 遍历代码,识别已经用到的CSS class。需要和mini-css-extract-plugin配合使用const MiniCssExtractPlugin = require('mini-css-extract-plugin'); const PurgecssPlugin = require('purgecss-webpack-plugin'); const PATHS = { src: path.join(__dirname, 'src'); } module.exports = { module: { rules: [ { test: /\.css$/, use: [ MiniCssExtractPlugin, 'css-loader' ] } ] }, plugins: [ new MiniCssExtractPlugin({ filename: '[name].css' }), new PurgecssPlugin({ paths: glob.sync(`${PATHS.src}/**/*`, {nodir: true}) }) ] }1
2
3
4
5
6
7
8
9
10
11
12
13
14
15
16
17
18
19
20
21
22
23
24
25
26
27
282.
uncss:HTML需要通过jsdom加载,所有的样式通过PostCSS解析,通过document.querySelector来识别在html文件里面不存在的选择器
🌙 9.Scope Hoisting减少闭包
![]()
上图中代码经过webpack打包之后会给模块加上一层函数包裹,import会被转换成__webpack_require(用来加载模块)。打包的结果是一个IIFE(自执行的匿名闭包函数)
问题:打包之后存在大量闭包代码,如果大量函数闭包包裹代码,会导致体积增大(模块越多越明显),运行代码时创建的函数作用域变多,内存开销变大。
Scope Hoisting原理:将所有模块的代码按照引用顺序放在一个函数作用域里面,然后适当的重命名一些变量以防止变量名冲突。从而减少函数声明代码和内存开销。使用:借助
ModuleConcatenationPlugin插件实现。(webpack的mode(opens new window):production时默认开启),必须是ES6语法,CommonJS不支持。plugins:[new webpack.optimize.ModuleConcatenationPlugin]1
🌙 10.代码分割
🌙 10.1 代码分割的意义
对于打的web应用来讲,将所有的代码都放在一个文件中显然是不够有效的,特别是当你的某些代码块是在某些特殊的时候才会被使用到。webpack有一个功能就是将你的代码分割成chunks(语块),当代码运行到需要他们的时候再进行加载。

适用场景:
- 抽离相同代码到一个共享模块。
- 脚本懒加载,使得初始下载的代码更小。
🌙 10.2 懒加载JS脚本
CommonJS:require.ensureES6:动态import(需要babel转换)
安装依赖:
yarn add @babel/plugin-syntax-dynamic-import -D
.babelrc中增加插件:
{
    "plugins": ["@babel/plugin-syntax-dynamic-import"]
}
2
3
🌙 11. 使用ESLint (opens new window)
# 安装依赖
yarn add eslint --dev

# 初始化配置
npx eslint --init
2
3
4
5
比如:react-ts项目eslint配置文件 (opens new window).eslinttrc.json:
{
  "extends": [
    "plugin:@typescript-eslint/recommended",
    "react-app",
    "prettier/@typescript-eslint",
    "plugin:prettier/recommended"
  ],
  "plugins": ["react", "@typescript-eslint", "prettier"],
  "env": {
    "browser": true,
    "jasmine": true,
    "jest": true
  },
  "rules": {
    "prettier/prettier": ["error", {
      "singleQuote": true,
      "trailingComma": "es5",
      "printWidth": 120,
      "endOfLine": "auto"
    }],
    "@typescript-eslint/interface-name-prefix": ["error", "always"],
    "@typescript-eslint/explicit-member-accessibility": 0,
    "@typescript-eslint/explicit-function-return-type": 0,
    "jsx-a11y/anchor-is-valid": 0
  },
  "parser": "@typescript-eslint/parser"
}
2
3
4
5
6
7
8
9
10
11
12
13
14
15
16
17
18
19
20
21
22
23
24
25
26
27
28
有些文件不需要eslint检测,可以加入.eslintignore配置文件中。
配置ESLint目的是为了代码规范化和统一化,那么如何落地呢?
和
CI/CD集成(生产阶段)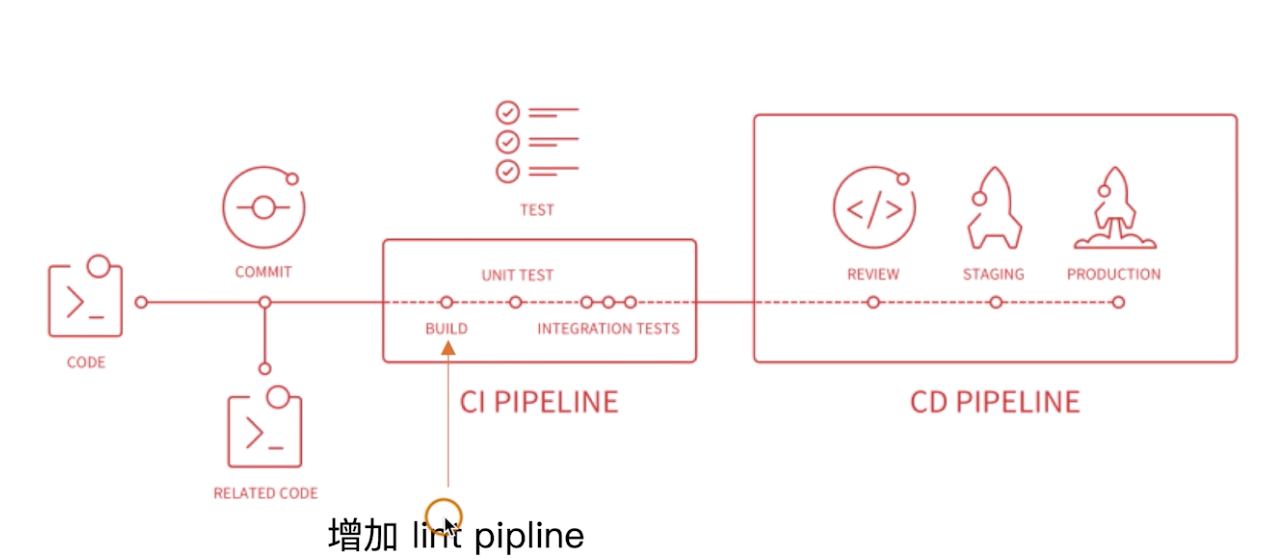
yarn add husky -D1package.json增加npm script:"scripts":{ "precommit": "lint-staged", "eslint": "eslint --fix" }, "lint-staged": { "linters": { "*.{js,ts,scss}":["eslint --fix", "git add"] } }1
2
3
4
5
6
7
8
9和
webpack集成(开发阶段)使用
eslint-loader,构建时检查规范:yarn add eslint-loader -D1配置
webpack:module.exports = { module: { rules: [ { test:/\.js$/, exclude: /node_modules/, use: [ 'babel-loader', 'eslint-loader' ] } ] } }1
2
3
4
5
6
7
8
9
10
11
12
13
14
🌙 12.打包库和组件
demo:实现一个大整数加法库的打包及发布
需要打包压缩版和非压缩版
支持
AMD/CJS/ESM模块引入// AMD方式 require(['large-number'], function(large-number){ largeNumber.add('999', '1'); }) // CJS const largeNumber = require('large-number'); largeNumber.add('999', '1'); //ESM import * as largeNumber from 'large-number'; largeNumber.add('999', '1');1
2
3
4
5
6
7
8
9
10
11
12通过
cdn直接引入:<!doctype html> <html> <script src="https://unpkg.com/large-number.js"></script> </html>1
2
3
4
打包输出的库名称:
未压缩版:
large-number.js压缩版:
large-number.min.js|-/dist |-large-number.js |-large-number.min.js |-webpack.config.js |-package.josn |-index.js 入口文件 |-/src |-index.ts 源码实现处1
2
3
4
5
6
7
8
配置
webpack:- library:指定库的全局变量
- libraryTarget (opens new window):支持库引入的方式(
AMD/CJS/ESM:'umd')
const path = require('path');
const TerserPlugin = require('terser-webpack-plugin');

module.exports = {
    entry: {
        'large-number': './src/index.ts',
        'large-number.min': './src/index.ts'
    },
    output: {
        filename: '[name].js',
        library: 'largeNumber',
        libraryExport: 'default',
        libraryTarget: 'umd',
        path: path.resolve(__dirname, 'dist'),
    },
    resolve: {
        extensions: [ '.tsx', '.ts', '.js' ],
    },
    // 配置typescript
    module: {
        rules: [
            {
                test: /\.tsx?$/,
                use: 'ts-loader',
                exclude: /node_modules/,
            },
        ],
    },
    // 指定*.min才压缩
    mode: 'none', // 关闭production模式
    optimization: {
        minimize: true,
        minimizer: [
            new TerserPlugin({
                include: /\.min\.js$/,
                parallel: true, // 开启并行压缩
                cache: true // 开启缓存
            })
        ]
    }
};
1
2
3
4
5
6
7
8
9
10
11
12
13
14
15
16
17
18
19
20
21
22
23
24
25
26
27
28
29
30
31
32
33
34
35
36
37
38
39
40
41设置入口文件:
package.json的main字段设为index.js,配置入口文件index.jsif (process.env.NODE_ENV === 'production'){ module.exports = require('./dist/large-number.min.js') } else { module.exports = require('./dist/large-number.js') }1
2
3
4
5实现
./src/index.ts:/** * function add: 实现两个大数(字符串)相加 * @param a: string * @param b: string * return: string * */ export default function add(a: string, b: string): string { // 字符串的index let i = a.length - 1; let j = b.length - 1; // 相加的结果 let result = ''; // 进位标志 let carry = 0; // 开始循环遍历 while(i >= 0 || j >= 0) { // a、b对应位数上的初始化值 let x = 0; let y = 0; let sum; if(i >= 0) { x = +a[i]; i--; } if(j >= 0) { y = +b[j]; j--; } // 求和 sum = x + y + carry; if(sum >= 10) { carry = 1; sum -= 10; } else { carry = 0; } // 第一次 0 + '' result = sum + result; } // 字符串拼接 if(carry) { result = carry + result; } return result; }1
2
3
4
5
6
7
8
9
10
11
12
13
14
15
16
17
18
19
20
21
22
23
24
25
26
27
28
29
30
31
32
33
34
35
36
37
38
39
40
41
42
43
44
45
46
47
48
49
50
51
52
53
🌙 13. SSR打包方案
🌙 13.1 服务端渲染(SSR)概念
SSR:服务端渲染,有服务端准备好所有的html资源(css、js、data、图片等),浏览器直接渲染html。
服务端渲染(SSR)核心——减少请求
| 客户端渲染 | 服务端渲染 | |
|---|---|---|
| 请求 | 多个请求(html、css、data、js等 ) | 1个请求 |
| 加载过程 | HTML 等相关资源串行加载 | 1个请求返回HTML所有相关资源 |
| 渲染 | 前端渲染 | 服务端渲染 |
| 可交互 | 图片等静态资源加载完成,JS逻辑执行完成可交互 | 同客户端渲染 |
🌙 13.2 服务端渲染(SSR)实现
服务端:
- 使用
react-dom/server的renderToString方法将React组件渲染字符串 - 服务端路由返回对应的模板
- 使用
客户端
- 打包出针对服务端的组件
webpack ssr打包问题:- 1.浏览全局变量(
NodeJS中没有document和window)- 组件适配:将不兼容的组件根据打包环境进行适配
- 请求适配:将
fetch或ajax发送的请求方法改写为isomorphic-fetch或axios
- 2.样式问题(
NodeJS无法解析CSS)- 方案一:服务端打包通过
ignore-loader忽略css的解析 - 方案二:将
style-loader替换为isomorphic-style-loader
- 方案一:服务端打包通过
- 1.浏览全局变量(
🌙 14.webpack通用配置设计
🌙 14.1 构件配置抽离成npm包的意义
通用性
- 业务开发者无需关注构建配置
- 统一团队构件脚本
可维护性
- 构件配置合理的拆分
README文档、CHANGELOG文档等
质量
- 冒烟测试、单元测试、测试覆盖率等
- CI/CD持续集成
🌙 14.2 构件配置管理的可选方案
- 通过多个配置文件管理不同环境的构件, 对
webpack --config参数进行控制 - 将构建配置设计成一个库,比如:
hjs-webpack、Neutrino、webpack-blocks - 抽成一个工具进行管理,比如:
create-react-app、kyt、nwb - 将所有的配置放在一个文件,通过
--env参数控制分支选择
🌙 14.3 构建配置包的设计
通过多个配置文件管理不同环境的webpack配置
- 基础配置:
webpack.base.js - 开发环境:
webpack.dev.js - 生产环境:
webpack.prod.js SSR环境:webpack.ssr.js- ···
抽离成一个npm包统一管理:
- 规范:
Git commit日志、README、ESLint规范、Semver规范 - 质量:冒烟测试、单元测试、测试覆盖率和CI/CD
通过webpack-merge组合配置:
const merge = require('webpack-merge');

// merge({a:[1],b:5,c:20},{a:[2],b:10,d:33})
// {a:[1,2],b:10,c:20,d:33}

const baseConfig = require('./webpack.base.js');
const devConfig = {
    // webpack配置
    plugins:[],
    module: {}
	...
}

// 合并配置
module.exports = merge(baseConfig, devConfig);
2
3
4
5
6
7
8
9
10
11
12
13
14
15
🌙 14.4 功能模块设计
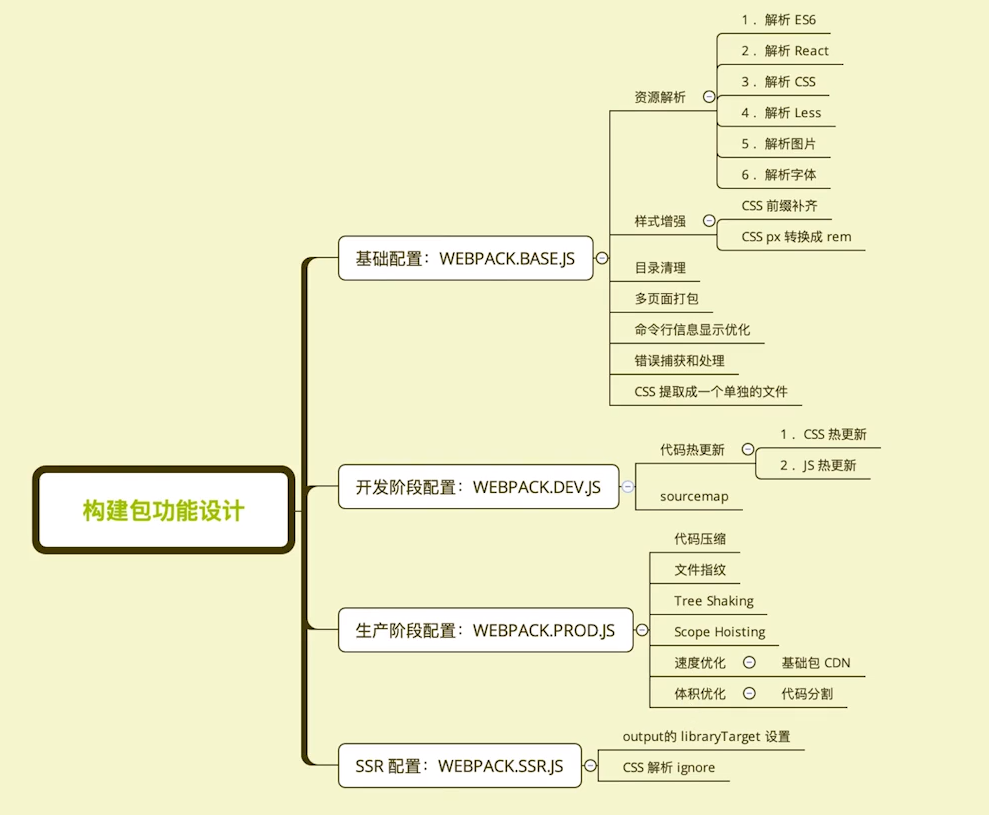
🌙 14.5 功能目录设计
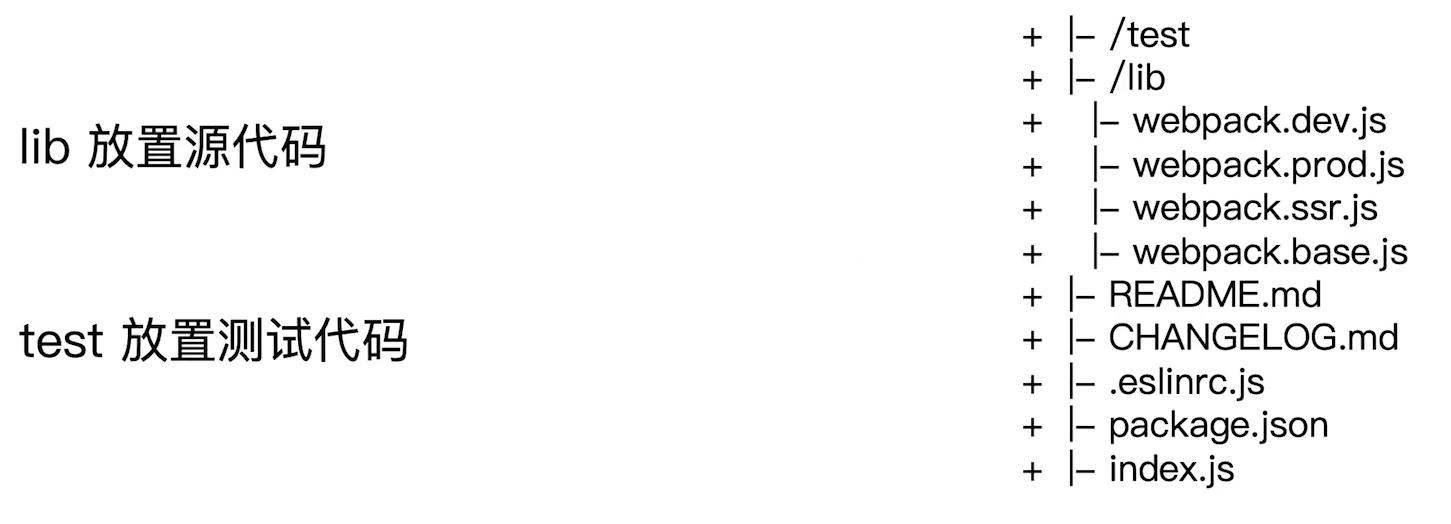
🌙 14.5 代码实现
webpack.base.js:'use strict'; const glob = require('glob'); const path = require('path'); const webpack = require('webpack'); const HtmlWebpackPlugin = require('html-webpack-plugin'); const CleanWebpackPlugin = require('clean-webpack-plugin'); const FriendlyErrorsWebpackPlugin = require('friendly-errors-webpack-plugin'); const Autoprefixer = require('autoprefixer'); // 多页面打包配置 const setMPA = () => { const entry = {}; const htmlWebpackPlugins = []; const entryFiles = glob.sync(path.join(__dirname, './src/*/index.js')); Object.keys(entryFiles) .map((index) => { const entryFile = entryFiles[index]; // '/Users/cpselvis/my-project/src/index/index.js' const match = entryFile.match(/src\/(.*)\/index\.[js|tsx?]/); const pageName = match && match[1]; entry[pageName] = entryFile; htmlWebpackPlugins.push( new HtmlWebpackPlugin({ template: path.join(__dirname, `src/${pageName}/index.html`), filename: `${pageName}.html`, chunks: [pageName], inject: true, minify: { html5: true, collapseWhitespace: true, preserveLineBreaks: false, minifyCSS: true, minifyJS: true, removeComments: false } }) ); }); return { entry, htmlWebpackPlugins } } const { entry, htmlWebpackPlugins } = setMPA(); module.exports = { entry: entry, output: { path: path.join(__dirname, 'dist'), filename: '[name].js' }, resolve: { extensions: [ '.tsx', '.ts', '.js' ], }, module: { rules: [ { test: /.js$/, use: 'babel-loader' }, { test: /\.tsx?$/, use: 'ts-loader', exclude: /node_modules/, }, { test: /.css$/, use: [ 'style-loader', 'css-loader' ] }, { test: /.less$/, use: [ 'style-loader', 'css-loader', 'less-loader', // 自动补齐css前缀 { loader: 'postcss-loader', options: { pluguins:() => [ Autoprefixer({ // 指定兼容的浏览器最低版本 browsers:['last 2 version', '>1%', 'ios 7'] }) ] } } // 将px ---> rem { loader: 'px2rem-loader', options: { // 1rem = 75px remUnit: 75, // rem小数点位数 remPrecision: 8 } } ] }, { test: /.(png|jpg|gif|jpeg)$/, use: [ { loader: 'url-loader', options: { limit: 10240 } } ] }, { test: /.(woff|woff2|eot|ttf|otf)$/, use: 'file-loader' } ] }, plugins: [ // 目录清理 new CleanWebpackPlugin(), // 命令行显示优化 new FriendlyErrorsWebpackPlugin(), // 错误监控 function handleErrorPlugin() { this.hooks.done.tap('done', (stats) => { if (stats.compilation.errors && stats.compilation.errors.length && process.argv.indexOf('--watch') == -1) { // eslint-disabled-next-line console.log('build error'); process.exit(1); } }) } ].concat(htmlWebpackPlugins), stats: 'errors-only' };1
2
3
4
5
6
7
8
9
10
11
12
13
14
15
16
17
18
19
20
21
22
23
24
25
26
27
28
29
30
31
32
33
34
35
36
37
38
39
40
41
42
43
44
45
46
47
48
49
50
51
52
53
54
55
56
57
58
59
60
61
62
63
64
65
66
67
68
69
70
71
72
73
74
75
76
77
78
79
80
81
82
83
84
85
86
87
88
89
90
91
92
93
94
95
96
97
98
99
100
101
102
103
104
105
106
107
108
109
110
111
112
113
114
115
116
117
118
119
120
121
122
123
124
125
126
127
128
129
130
131
132
133
134
135
136
137
138
139
140
141
142
143
144webpack.dev.js:'use strict'; const webpack = require('webpack'); const merge = require('webpack-merge'); // 导入webpack.base.js const baseConfig = require('./webpackbase.js'); const devConfig = { mode: 'development', plugins: [ // 热更新 new webpack.HotModuleReplacementPlugin(), ], devServer: { contentBase: './dist', hot: true, stats: 'errors-only' }, devtool: 'cheap-source-map' }; module.exports = merge(baseConfig, devConfig);1
2
3
4
5
6
7
8
9
10
11
12
13
14
15
16
17
18
19
20
21
22webpack.prod.js:'use strict'; const webpack = require('webpack'); const MiniCssExtractPlugin = require('mini-css-extract-plugin'); const OptimizeCSSAssetsPlugin = require('optimize-css-goImg-webpack-plugin'); const cssnano =require('cssnano'); const merge = require('webpack-merge'); // 导入webpack.base.js const baseConfig = require('./webpackbase.js'); const prodConfig = { mode: 'production', plugins: [ new MiniCssExtractPlugin({ filename: '[name]_[contenthash:8].css' }), // 压缩CSS new OptimizeCSSAssetsPlugin({ assetNameRegExp: /\.css$/g, cssProcessor: cssnano }), // 分离基础库 new HtmlWebpackExternalsPlugin({ externals: [ { module: 'react', entry: 'https://11.url.cn/now/lib/16.2.0/react.min.js', global: 'React', }, { module: 'react-dom', entry: 'https://11.url.cn/now/lib/16.2.0/react-dom.min.js', global: 'ReactDOM', }, ] }), ], // 提取公共资源包 optimization: { splitChunks: { minSize: 0, cacheGroups: { commons: { name: 'commons', chunks: 'all', minChunks: 2 } } } } stats: 'errors-only' }; module.exports = merge(baseConfig, prodConfig);1
2
3
4
5
6
7
8
9
10
11
12
13
14
15
16
17
18
19
20
21
22
23
24
25
26
27
28
29
30
31
32
33
34
35
36
37
38
39
40
41
42
43
44
45
46
47
48
49
50
51
52
53
54webpack.ssr.js:'use strict'; const webpack = require('webpack'); const MiniCssExtractPlugin = require('mini-css-extract-plugin'); const OptimizeCSSAssetsPlugin = require('optimize-css-goImg-webpack-plugin'); const cssnano =require('cssnano'); const merge = require('webpack-merge'); // 导入webpack.base.js const baseConfig = require('./webpackbase.js'); const ssrConfig = { mode: 'none', module: { rules: [ { test: /\.css$/, use: 'ignore-loader' }, { test: /\.less$/, use: 'ignore-loader' }, ] }, plugins: [ new MiniCssExtractPlugin({ filename: '[name]_[contenthash:8].css' }), // 压缩CSS new OptimizeCSSAssetsPlugin({ assetNameRegExp: /\.css$/g, cssProcessor: cssnano }), // 分离基础库 new HtmlWebpackExternalsPlugin({ externals: [ { module: 'react', entry: 'https://11.url.cn/now/lib/16.2.0/react.min.js', global: 'React', }, { module: 'react-dom', entry: 'https://11.url.cn/now/lib/16.2.0/react-dom.min.js', global: 'ReactDOM', }, ] }), ], stats: 'errors-only' }; module.exports = merge(baseConfig, ssrConfig);1
2
3
4
5
6
7
8
9
10
11
12
13
14
15
16
17
18
19
20
21
22
23
24
25
26
27
28
29
30
31
32
33
34
35
36
37
38
39
40
41
42
43
44
45
46
47
48
49
50
51
52
53
🌙 15.冒烟测试——保证构件成功
冒烟测试(
smoke testing):指对提交测试的软件在进行详细深入的测试之前而进行的预测试,预测试的主要目的是暴露导致软件需要重新发布的基本功能失效等严重问题(保证基本功能可以,流程行得通)。判断构件是否成功:
const path = require('path');
const webpack = require('webpack');
const rimraf = require('rimraf');
const Mocha = require('mocha');

const mocha = new Mocha({
    timeout: '10000ms',
});

process.chdir(__dirname);

rimraf('./dist', () => {
    const prodConfig = require('../../lib/webpack.prod.js');
    webpack(prodConfig, (err, stats) => {
        if(err) {
            console.log(err);
            return;
        }

        console.log(stats.toString({
            color: true,
            modules: false,
            children: false,
            chunks: false,
            chunkModules: false
        }));

        console.log('\n' + 'Compile success, begin test')
    })
})
1
2
3
4
5
6
7
8
9
10
11
12
13
14
15
16
17
18
19
20
21
22
23
24
25
26
27
28
29
30-
const glob = require('glob-all');

describe('checking generated file exists', function() {
    it('should generate html files', function(done) {
        const files = glob.sync(
        	[
                './dist/index.html',
                './dist/search.html'
            ]
        );
        if (files.length > 0) {
            done();
        } else {
            throw new Error('No html files found!')
        }
    });
    it('should generate js&css files', function(done) {
        const files = glob.sync(
        	[
                './dist/index_*.js',
                './dist/search_*.js',
                './dist/index_*.css',
                './dist/search_*.css',
            ]
        );
        if (files.length > 0) {
            done();
        } else {
            throw new Error('No files found!')
        }
    });
})
1
2
3
4
5
6
7
8
9
10
11
12
13
14
15
16
17
18
19
20
21
22
23
24
25
26
27
28
29
30
31
32
🌙 16. 单元测试和测试覆盖率
🌙 16.1 单元测试
技术选型:
Mocha+Chai测试代码:
describe,it,expect测试命令:
mocha add.test.jsadd.test.jsconst expect = require('chai').expect; const add = require('../src/add.js'); describe('use expect: src/add.js', () => { it('add(1, 2) === 3', () => { expect(add(1,2).to.equal(3)); }); });1
2
3
4
5
6
7
8
9webpack打包测试 (opens new window)
const assert = require('assert');

describe('webpack.base.js test case', () => {
    const baseConfig = require('../../lib/webpack.base.js')

    it('entry', () => {
        assert.equal(baseConfig.entry.index, '/Users/cpselvis/my-project/builder-webpack/test/smoke/template/src/index/index.js');
        assert.equal(baseConfig.entry.search, '/Users/cpselvis/my-project/builder-webpack/test/smoke/template/src/search/index.js');
    });
});
1
2
3
4
5
6
7
8
9
10package.json:{ "scripts": { "test": "./node_modules/./bin/_mocha" } }1
2
3
4
5
🌙 16.2 测试覆盖率-istanbul (opens new window)
安装依赖:
yarn add -g istanbul1查看测试覆盖率
istanbul cover test.js1
🌙 17.CI/CD持续集成
1.作用:
- 快速发现错误
- 防止分支大幅偏离主干
- 核心措施: 代码集成到主干之前,必须通过自动化测试。只要一个测试用例失败,就不能集成。
2.技术选型
travis (opens new window):
.travis.yml配置入下language: node_js sudo: false cache: # 开启缓存 apt: true directorirs: - node_modules node_js: stable # 设置对应的版本 install: - npm install -D # 安装构建器依赖 - cd ./test/template-project - npm install -D # 安装模板项目依赖 - cd ../../../ script: - npm test1
2
3
4
5
6
7
8
9
10
11
12
13
14
15
16
17
18
19登陆travis (opens new window): 使用github账号登录,在https://travis-ci.org/account/repositories为项目启动,并在项目根目录下新增上述
.travis.yml文件。
🌙 18.发布npm包 (opens new window)
登陆用户:
npm login升级版本:
- 升级补丁版本号:
npm version patch - 升级小版本号:
npm version minor - 升级大版本号:
npm version major
- 升级补丁版本号:
发布之前:
git tag 版本号发布版本:
npm publish版本信息说明:遵守
semever规范(避免出现循环依赖,减少依赖冲突)- 版本通常由三维组成,形如
X.Y.Z。x主版本号(当你做了不兼容的API修改)Y次版本号(当你做了向下兼容的功能性新增)Z修订号(当你做了向下兼容的问题修正) - 版本是严格递增的
16.2.0→16.3.0→16.3.1。 - 在发布重要版本时,可以发布
alpha(内部测试版,一般不向外部发布,会有很多BUG,一般只有测试人员使用),beta(测试版本,这个阶段会一直加入新的功能,在alpha版之后推出)、rc(Release Candidate系统平台上的就是发行候选版本。RC版不会再加入新的功能了,主要着重除错)等先行版本。 - 先行版本号格式:
修订版本号 - [rc|beta|appha].[0-9A-Za-z]。比如16.3.0-rc.3、16.0.4-beta.4
- 版本通常由三维组成,形如
🌙 19. git commit规范和changelog
🌙 19.1 git commit 规范
良好的git commit 规范优势:
- 加快
code review的流程 - 根据
git commit的元数据生成changelog - 后续维护者可以知道
feature被修改的原因
技术方案:
统一团队git commit的日至标准,便于后续代码review和版本发布
使用angular的git commit 日志作为基本规范:”提交类型: 提交信息“。
docs: 更新CHANGELOG文档1| 提交类型 | 说明 | | -------- | --------------------------------------------------------- | | feat | 新增feature | | fix | 修复bug | | docs | 紧急修改了文档,比如
READNE、CHENGELOG、CONTRIBUTE等 | | style | 紧急修改了空格、格式缩进、逗号等,不修改代码逻辑 | | refactor | 代码重构,没有加新功能或者修复bug | | perf | 优化相关,比如提升性能、体验 | | test | 测试用例,包括单元测试、集成测试等 | | chore | 改变构件流程或者增加依赖、工具等 | | revert | 回滚到上一个版本 |本地开发阶段增加
precommit钩子:yarn add husky -S1配置
packagejson:{ "script": { "commitmsg": "validate-commiyt-msg", "changelog": "conventional-changelog -p angular -i CHANGELOG.md -s -r O" } }1
2
3
4
5
6
🌙 19.2 changelog的生成:
日志提交时有好的类型选择提示: 使用commitize工具
不符合要求格式的日志拒绝提交的保证机制: 使用validat-commit-msg工具 + 需要同时在客户端、gitlab server hook做
统一changelog文档信息生成: 使用conventional-changelog-cli工具
yarn add conventional-changelog-cli -S
yarn add validat-commit-msg -S
1
2配置
packagejson:{ "script": { // 保证commit规范 "commitmsg": "validate-commiyt-msg", // changelog生成 "changelog": "conventional-changelog -p angular -i CHANGELOG.md -s -r O" } }1
2
3
4
5
6
7
8